高度な AndEngine サンプル- Render Texture and Fragment Shaders
最初に警告しておかなければいけませんが、この高度なAndEngine サンプルに関する一連の記事は、初心者が段階的に学ぶためのチュートリアルではありません。 これらの記事は、既にAndEngineの使い方について知っているより上のAndEngine ユーザーを対象としています。
AndEngine には多くの高度な機能が実装されています。高度なものほどチュートリアルは少なく、実用的なサンプルとなるとさらに数が減ります。 本日は、多くの人が知らない、使っている人にいたってはさらに少ないであろう二つの機能について説明します: rendering to a texture と fragment shadersです.
Render Texture
AndEngine ではsceneを画面に描写することができます。 But what if you want to render something as a picture for later use? そこでrender textureの出番です。
まず最初にtextureに何かを描写します。textureによってはファイルからメモリへ読み込みますが、今回は空のtexture を用意してその上にengine を使って"描写"を行います。 それから、それを例えばSpriteのような別のtextureとして使用します。
これは何のために必要なのでしょうか? なんと、Dirt Rider Mayhemで使われているカッコいいポラロイド写真のような演出をすることができるのです。 制作者のNazgee 氏は、おそらくこのチュートリアルと似たようなやり方をしているはずです。では以下のサンプルを見てください:
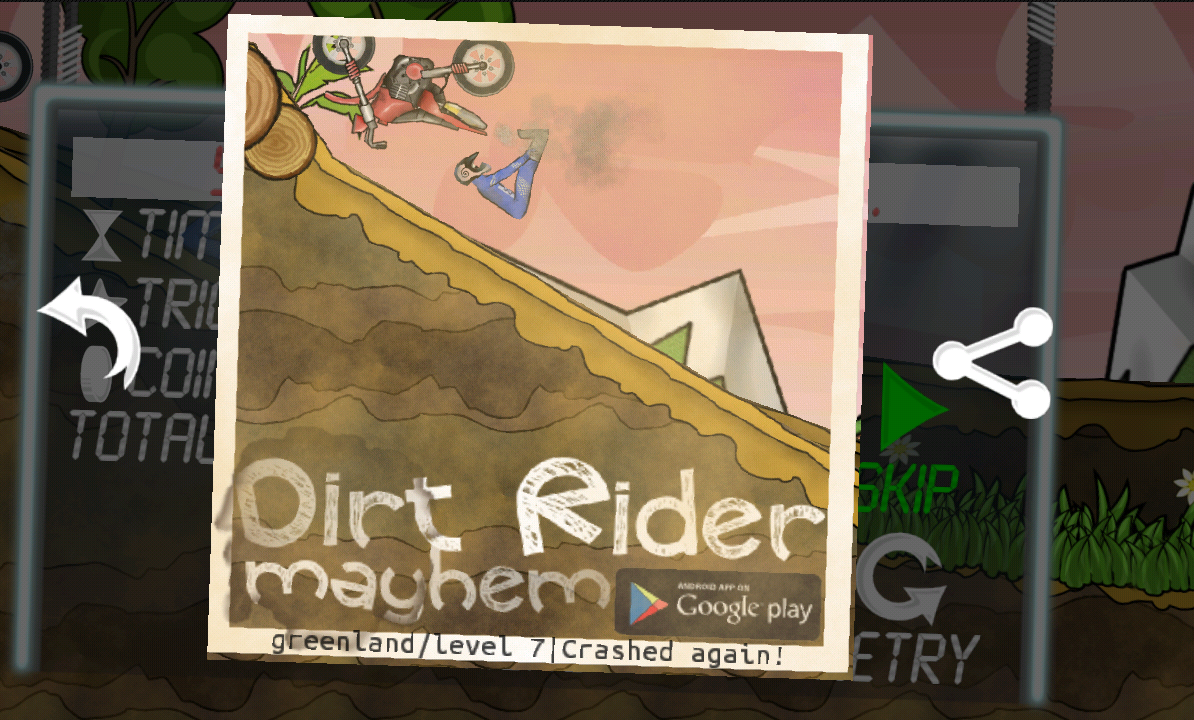
"ポラロイド" のスクリーンショットはトリミングされ、枠が付けられています。セピア風の演出と余白が付いています。 とても素晴らしい ! ではこのよう演出をどうやって再現するのでしょうか? 実はとても簡単です。 このページに、AndEngineフォーラムの別のメンバーMip氏が書いた素晴らしいrender texture チュートリアルがあります。
全ての処理はonManagedDraw メソッド内に記述されています、詳細はリンク先のチュートリアルを参照してください!
Mip氏のコードを基にして、 render texture機能を持つEntity を作成しました。Entityに貼り付けたものは全て、textureへ描写されます。その後、このtexture を任意の数のspriteで使用できます!
But of course just taking a picture and immediatelly showing it would look quite plain. And that's why we need:
Shaders
AndEngineのShaders についてより知りたい場合は、ltmon氏の記載したこのAndEngine shadersチュートリアルを読むことをお勧めします。 そちらではGLSL languageの基本的な紹介を含め、shaderについてよく説明されています。
What I did was to create a black and white fragment shader. If you've read the linked forum post, you now know that fragments are more or less pixels. So what I did I simply set red, green and blue values of each fragment to the intensity value. Calculated as 30% red, 59% green and 11% blue, which roughly corresponds to human vision perception of these colors. Creating a sepia effect is actually similar to this approach, but you have to use different color weights.
Anyway as a base, I used PositionTextureCoordinatesShaderProgram class from AndEngine which takes a pixel from texture (after transforms) and draws its exact color on screen. I just changed the exact color to intensity.
Here's the relevant part:
  public static final String FRAGMENTSHADER =
      "precision lowp float;¥n" +
      "uniform sampler2D " + ShaderProgramConstants.UNIFORM_TEXTURE_0 + ";¥n" +
      "varying mediump vec2 " + ShaderProgramConstants.VARYING_TEXTURECOORDINATES + ";¥n" +
      "void main() {¥n" +
      " vec4 myColor = texture2D(" + ShaderProgramConstants.UNIFORM_TEXTURE_0 + ", " + ShaderProgramConstants.VARYING_TEXTURECOORDINATES + ");¥n" +
      " gl_FragColor.r = dot(myColor.rgb, vec3(.3, .59, .11));¥n" +
      " gl_FragColor.g = dot(myColor.rgb, vec3(.3, .59, .11));¥n" +
      " gl_FragColor.b = dot(myColor.rgb, vec3(.3, .59, .11));¥n" +
      " gl_FragColor.a = myColor.a;¥n" +
      "}";
Putting it all together
As a next step I have attached a Sprite with badge texture to the RenderEntity - it gets rendered to a texture. Then I attached two Sprites to the scene. One of the shows the rendered texture unchanged and the second shows the texture with the black and white shader applied. And here is the result:

Different uses of these techniques
The render texture can help you speed things up and shaders are just great and useful for many things. Combining these two techniques you can create really cool effects like game event photos - as seen in Dirt Rider Mayhem. Which was my main motivation ;) Or you can use it to apply fullscreen shaders. Simply render everything to a texture and then apply shaders!
Source code
The code is pretty simple and it's basically just copy&paste from the sources above but if you want it, let me know. It's just a bit more work so I want to know if it is worth putting any effort to it.
I got a few requests half a year after this tutorial :) I posted the sources in a new article.