
サイト内検索
Android requires that all APKs be digitally signed with a certificate before they can be installed. This document describes how to sign your APKs using Android Studio, including creating and storing your certificate, signing different build configurations using different certificates, and configuring the build process to sign your APKs automatically.
A public-key certificate, also known as a digital certificate or an identity certificate, contains the public key of a public/private key pair, as well as some other metadata identifying the owner of the key (for example, name and location). The owner of the certificate holds the corresponding private key.
When you sign an APK, the signing tool attaches the public-key certificate to the APK. The public-key certificate serves as as a "fingerprint" that uniquely associates the APK to you and your corresponding private key. This helps Android ensure that any future updates to your APK are authentic and come from the original author.
A keystore is a binary file that contains one or more private keys. When you sign an APK for release using Android Studio, you can choose to generate a new keystore and private key or use a keystore and private key you already have. You should choose a strong password for your keystore, and a separate strong password for each private key stored in the keystore. You must keep your keystore in a safe and secure place. See Securing Your Private Key, below.
You must use the same certificate throughout the lifespan of your app in order for users to be able to install new versions as updates to the app. For more about the benefits of using the same certificate for all your apps throughout their lifespans, see Signing Considerations below.
When running or debugging your project from the IDE, Android Studio
automatically signs your APK with a debug certificate generated by the
Android SDK tools. The first time you run or debug your project in Android
Studio, the IDE automatically creates the debug keystore and certificate in
$HOME/.android/debug.keystore, and sets the keystore and key
passwords.
Because the debug certificate is created by the build tools and is insecure by design, most app stores (including the Google Play Store) will not accept an APK signed with a debug certificate for publishing.
Android Studio automatically stores your debug signing information in a signing configuration so you do not have to enter it every time you debug. A signing configuration is an object consisting of all of the necessary information to sign an APK, including the keystore location, keystore password, key name, and key password. You cannot directly edit the debug signing configuration, but you can configure how you sign your release build.
For more information about how to build and run apps for debugging, see Build and Run Your App.
The self-signed certificate used to sign your APK for debugging has an expiration date of 365 days from its creation date. When the certificate expires, you will get a build error.
To fix this problem, simply delete the debug.keystore file. The file is stored in
the following locations:
~/.android/ on OS X and LinuxC:\Documents and Settings\<user>\.android\ on Windows XPC:\Users\<user>\.android\ on Windows Vista and Windows 7, 8, and 10The next time you build and run the debug build type, the build tools will regenerate a new keystore and debug key. Note that you must run your app, building alone does not regenerate the keystore and debug key.
You can use Android Studio to manually generate signed APKs, either one at a time, or for multiple build variants at once. Instead of manually signing APKs, you can also configure your Gradle build settings to handle signing automatically during the build process. This section describes the manual signing process. For more about signing apps as part of the build process, see Configure the Build Process to Automatically Sign Your APK.
To manually sign your APK for release in Android Studio, follow these steps:
If you already have a keystore, go to step 5. If you want to create a new keystore, click Create new.
On the New Key Store window, provide the following information for your keystore and key, as shown in figure 1.

Figure 1. Create a new keystore in Android Studio.
Keystore
Key
Once you complete the form, click OK.
On the Generate Signed APK Wizard window, select a keystore, a private key, and enter the passwords for both. (If you created your keystore in the last step, these fields are already populated for you.) Then click Next.
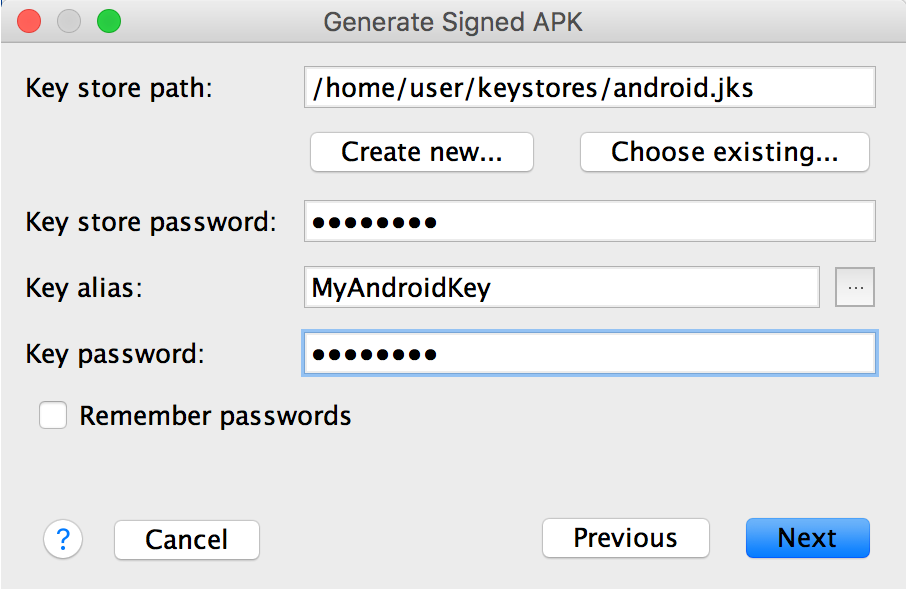
Figure 2. Select a private key in Android Studio.
On the next window, select a destination for the signed APK(s), select the build type, (if applicable) choose the product flavor(s), and click Finish.

Figure 3. Generate signed APKs for the selected product flavors.
Note: If your project uses product flavors, you can select multiple product flavors while holding down the Ctrl key on Windown/Linux, or the Command key on Mac OSX. Android Studio will generate a separate APK for each selected product flavor.
When the process completes, you will find your signed APK in the destination folder you selected above. You may now distribute your signed APK through an app marketplace like the Google Play Store, or using the mechanism of your choice. For more about how to publish your signed APK to the Google Play Store, see Get Started with Publishing. To learn more about other distribution options, read Alternative Distribution Options.
In order for users to succesfully install updates to your app, you will need to sign your APKs with the same certificate throughout the lifespan of your app. For more about this and other benefits of signing all your apps with the same key, see Signing Considerations below. For more information about securing your private key and keystore, see Securing Your Private Key.
In Android Studio, you can configure your project to sign your release APK automatically during the build process by creating a signing configuration and assigning it to your release build type. A signing configuration consists of a keystore location, keystore password, key alias, and key password. To create a signing configuration and assign it to your release build type using Android Studio, use the following steps:
 .
.
Select your keystore file, enter a name for this signing configuration (as you may create more than one), and enter the required information.
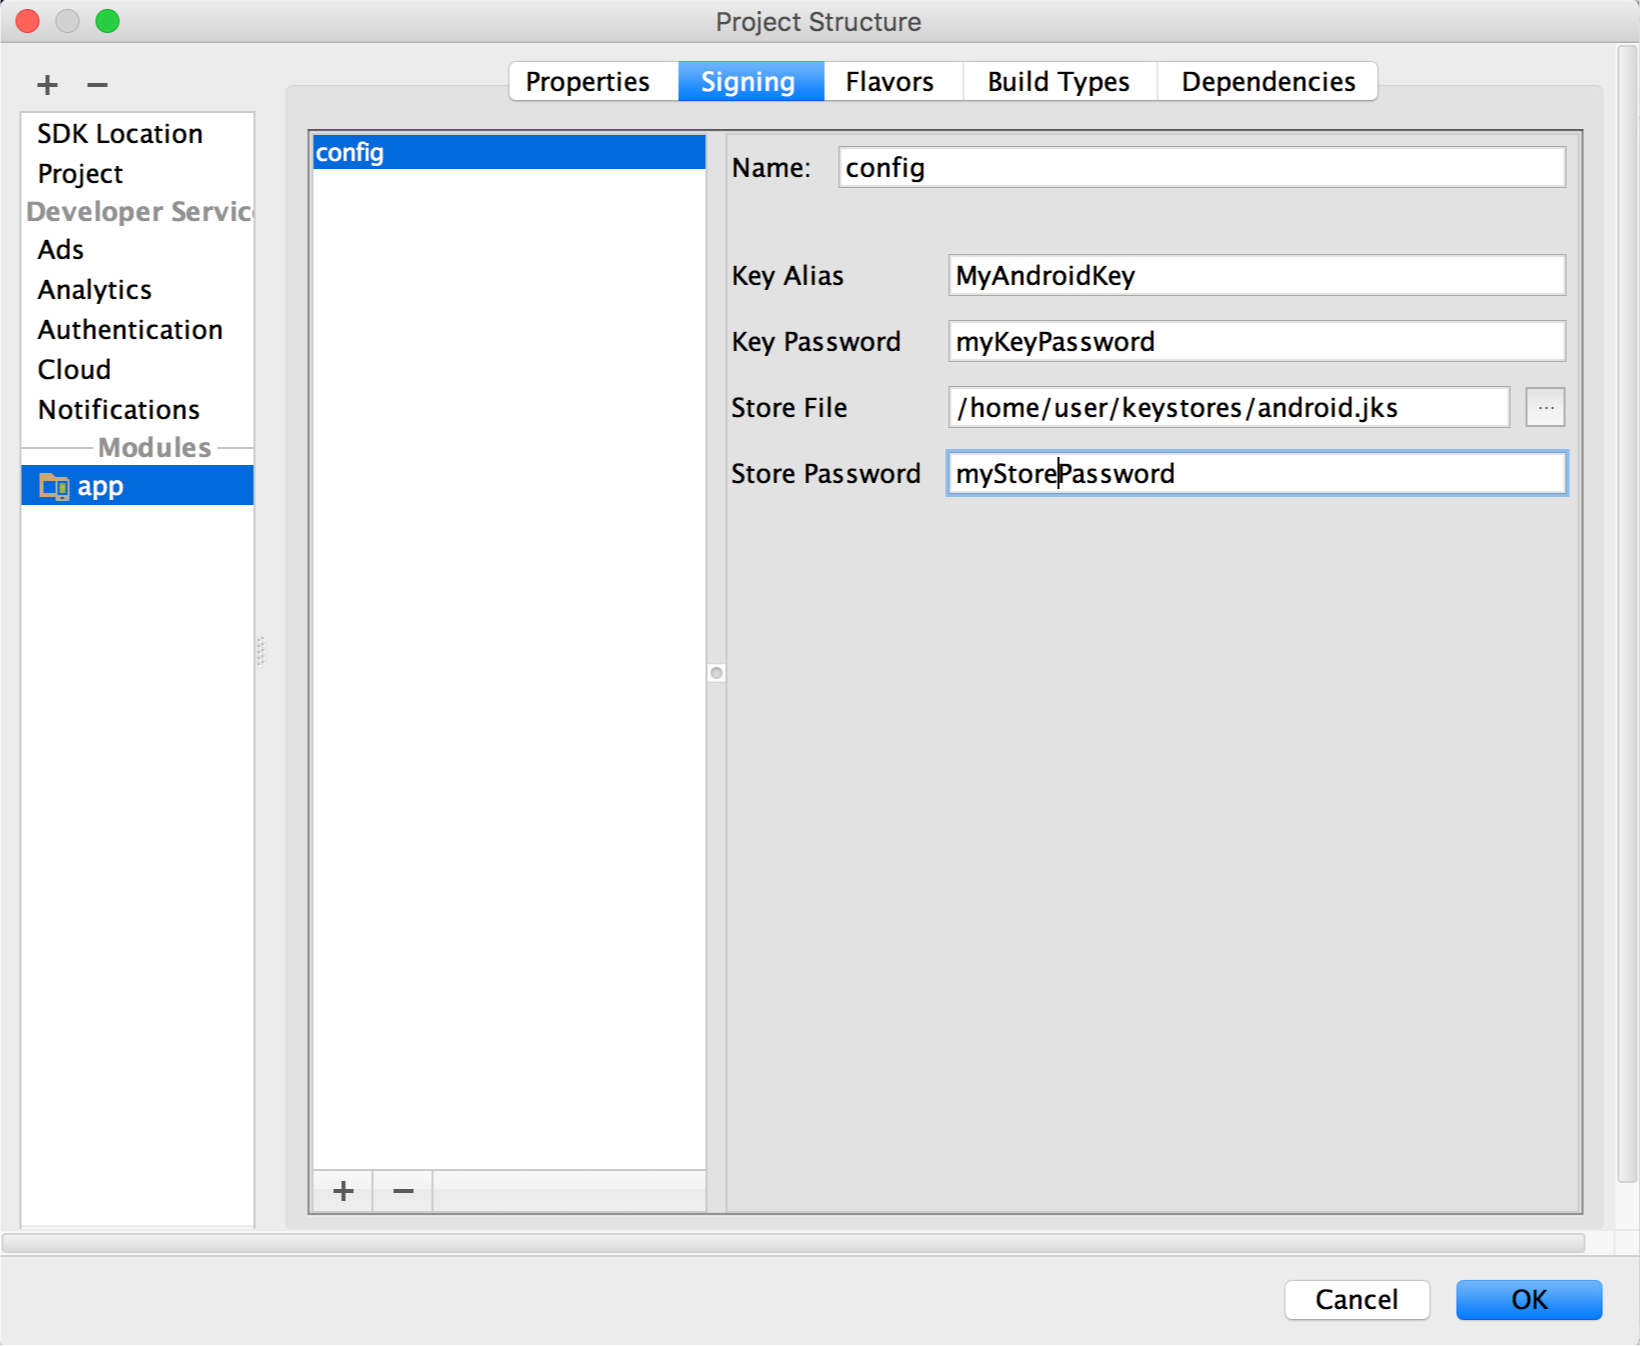
Figure 4. The window for creating a new signing configuration.
Under Signing Config, select the signing configuration you just created.
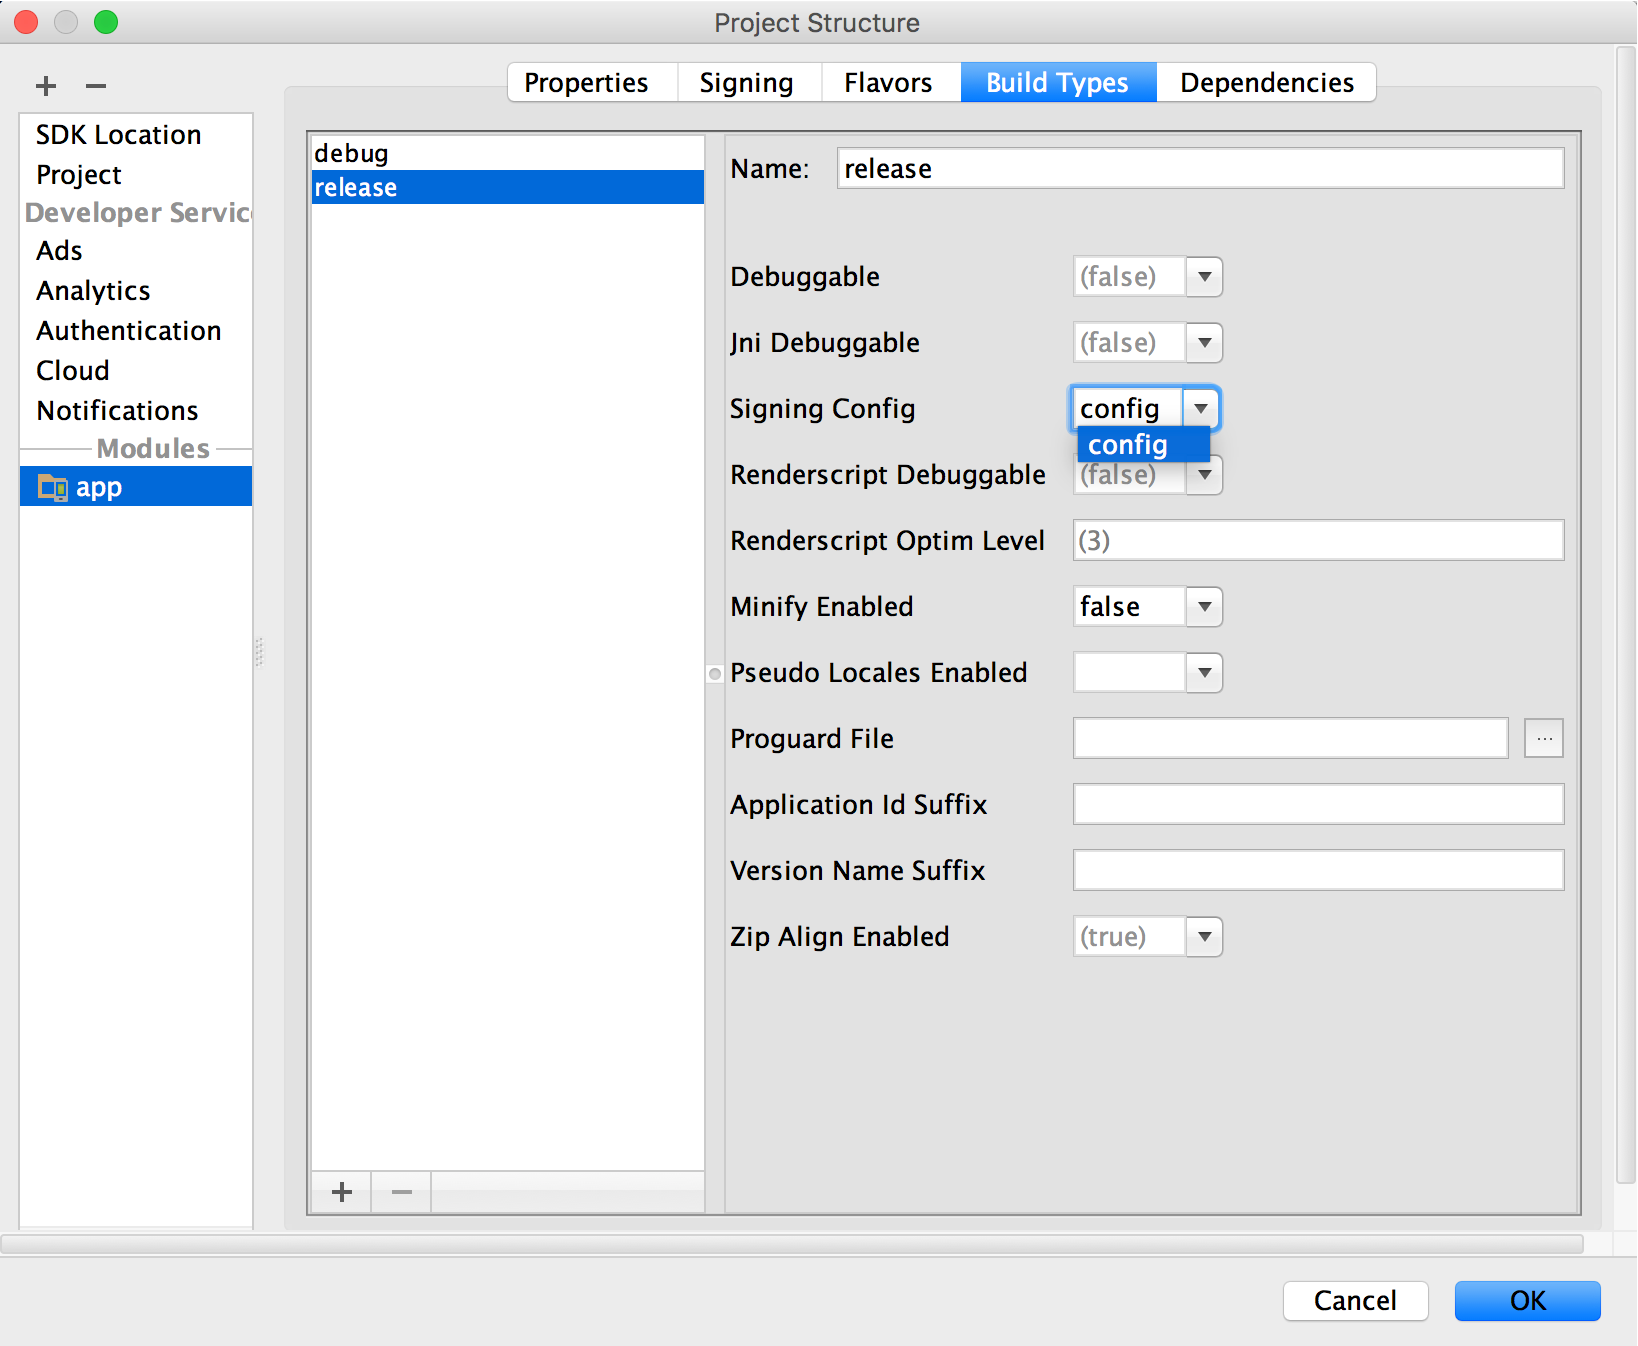
Figure 5. Select a signing configuration in Android Studio.
Now every time you build your release build type using Android Studio, the IDE will sign the APK
automatically, using the signing configuration you specified. You can find your signed APKs in the
build/outputs/apk/ folder inside the project directory for the
module you are building.
When you create a signing configuration, your signing information is included in plain text in your Gradle build files. If you are working in a team or sharing your code publicly, you should keep your signing information secure by removing it from the build files and storing it separately. You can read more about how to remove your signing information from your build files in Remove Signing Information from Your Build Files. For more about keeping your signing information secure, read Secure Your Private Key.
If your app uses product flavors and you would like to sign each flavor differently, you can create additional signing configurations and assign them by flavor:
 .
.
Select your keystore file, enter a name for this signing configuration (as you may create more than one), and enter the required information.
Figure 6. The window for creating a new signing configuration.
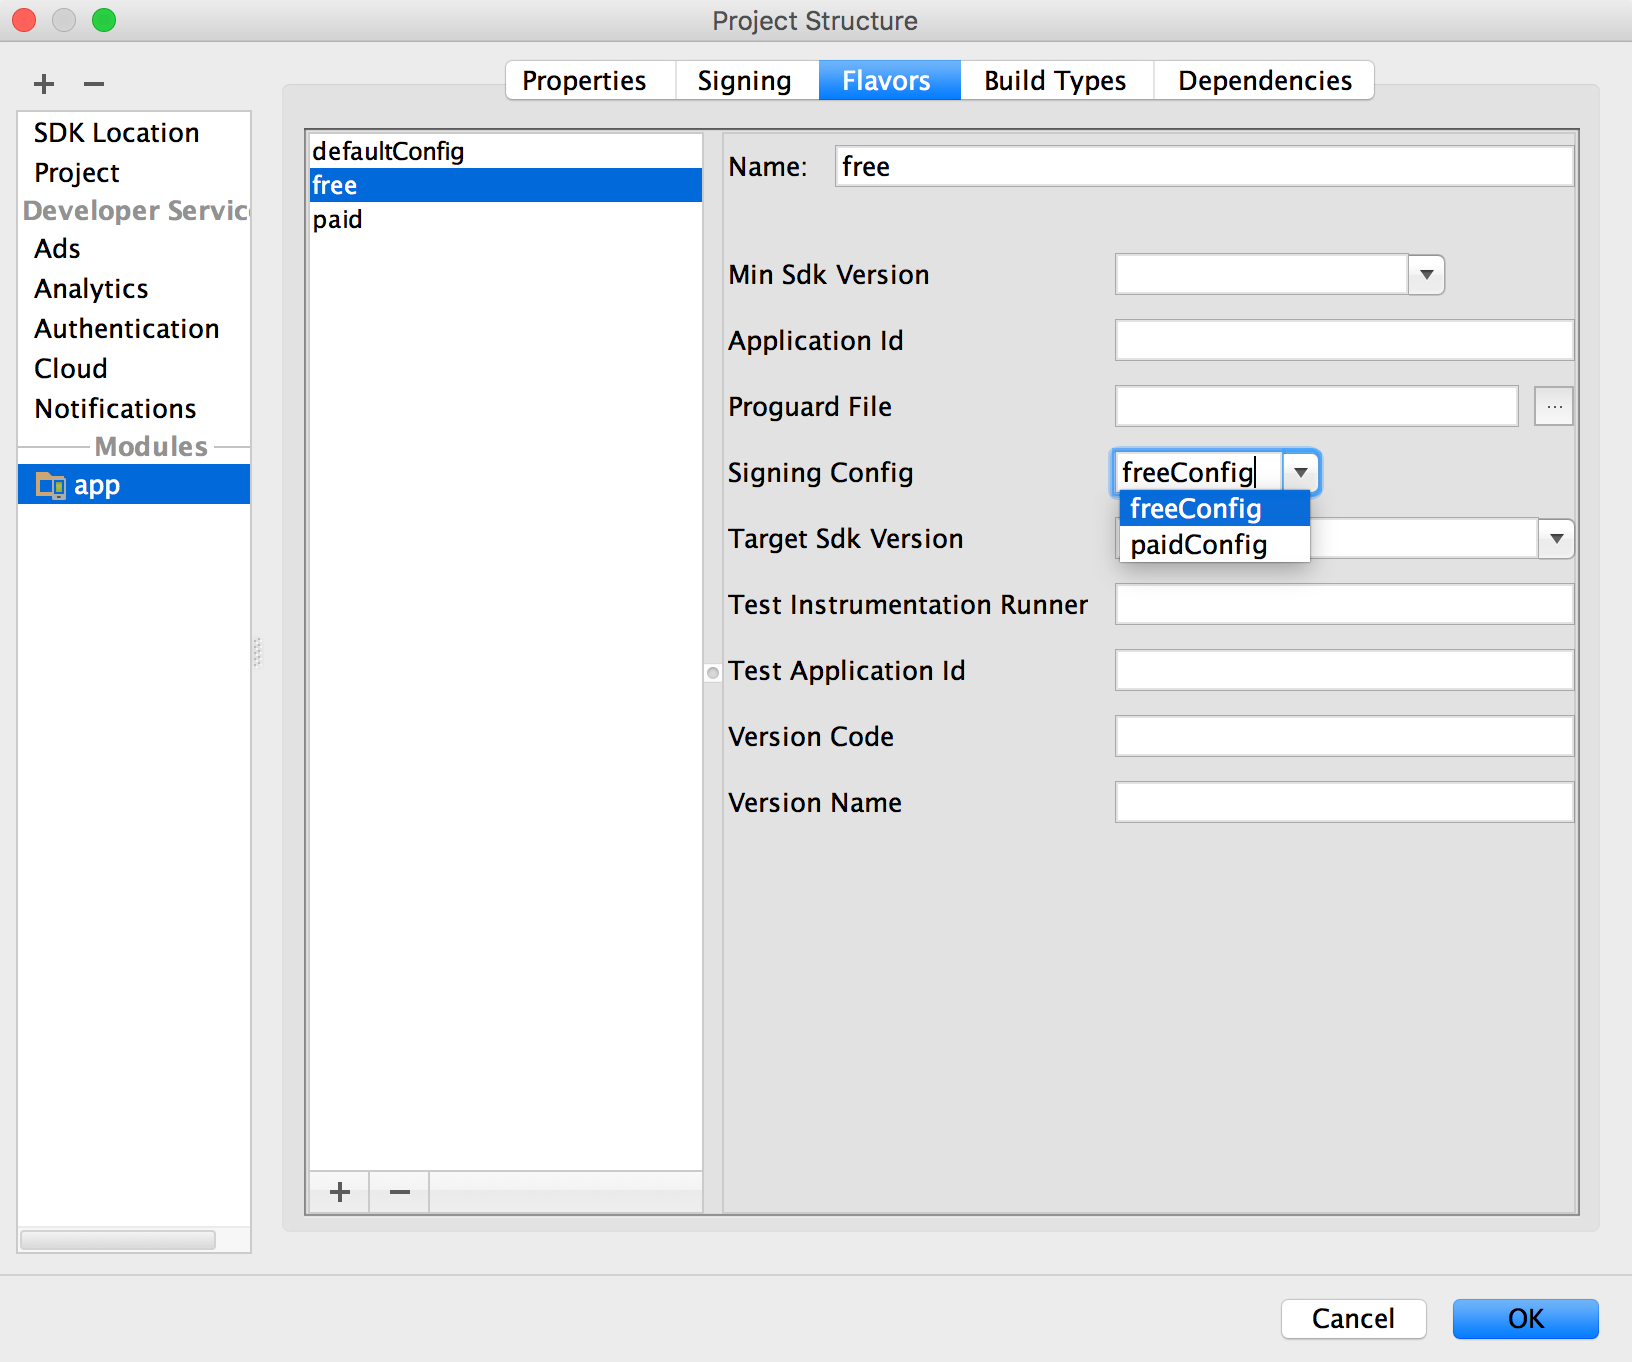
Figure 7. Configure signing settings by product flavor.
Repeat to configure any additional product flavors.
You can also specify your signing settings in Gradle configuration files. For more information, see Configuring Signing Settings.
When publishing Android Wear APKs, you package the wearable APK inside of a handheld APK, because users cannot browse and install apps directly on the wearable. Both APKs must be signed. For more information on packaging and signing Android Wear APKs, see Packaging Wearable Apps.
You should sign all of your APKs with the same certificate throughout the expected lifespan of your apps. There are several reasons why you should do so:
If you plan to support upgrades for an app, ensure that your key has a validity period that exceeds the expected lifespan of that app. A validity period of 25 years or more is recommended. When your key's validity period expires, users will no longer be able to seamlessly upgrade to new versions of your app.
If you plan to publish your apps on Google Play, the key you use to sign those APKs must have a validity period ending after 22 October 2033. Google Play enforces this requirement to ensure that users can seamlessly upgrade apps when new versions are available.
Maintaining the security of your private key is of critical importance, both to you and to the user. If you allow someone to use your key, or if you leave your keystore and passwords in an unsecured location such that a third-party could find and use them, your authoring identity and the trust of the user are compromised.
If a third party should manage to take your key without your knowledge or permission, that person could sign and distribute apps that maliciously replace your authentic apps or corrupt them. Such a person could also sign and distribute apps under your identity that attack other apps or the system itself, or corrupt or steal user data.
Your private key is required for signing all future versions of your app. If you lose or misplace your key, you will not be able to publish updates to your existing app. You cannot regenerate a previously generated key.
Your reputation as a developer entity depends on your securing your private key properly, at all times, until the key is expired. Here are some tips for keeping your key secure:
In general, if you follow common-sense precautions when generating, using, and storing your key, it will remain secure.
When you create a signing configuration, Android Studio adds your signing
information in plain text to the module's build.gradle files. If
you are working with a team or open-sourcing your code, you should move this
sensitive information out of the build files so it is not easily accessible
to others. To do this, you should create a separate properties file to store
secure information and refer to that file in your build files as follows:
keystore.properties in the root
directory of your project. This file should contain your signing information,
as follows:
storePassword=myStorePassword
keyPassword=mykeyPassword
keyAlias=myKeyAlias
storeFile=myStoreFileLocation
build.gradle file, add code to load your
keystore.properties file before the android {} block.
...

// Create a variable called keystorePropertiesFile, and initialize it to your
// keystore.properties file, in the rootProject folder.
def keystorePropertiesFile = rootProject.file("keystore.properties")

// Initialize a new Properties() object called keystoreProperties.
def keystoreProperties = new Properties()

// Load your keystore.properties file into the keystoreProperties object.
keystoreProperties.load(new FileInputStream(keystorePropertiesFile))

android {
    ...
}
Note: You could choose to store your
keystore.properties file in another location (for example,
in the module folder rather than the root folder for the project, or on
your build server if you are using a continuous integration tool). In
that case, you should modify the code above to correctly initialize
keystorePropertiesFile using your actual
keystore.properties file's location.
keystoreProperties
using the syntax keystoreProperties['propertyName']. Modify the
signingConfigs block of your module's build.gradle
file to reference the signing information stored in
keystoreProperties using this syntax.
android {
    signingConfigs {
        config {
            keyAlias keystoreProperties['keyAlias']
            keyPassword keystoreProperties['keyPassword']
            storeFile file(keystoreProperties['storeFile'])
            storePassword keystoreProperties['storePassword']
        }
    }
    ...
  }
build/outputs/apk/ directory for your module.
Because your build files no longer contain sensitive information, you can now
include them in source control or upload them to a shared codebase. Be sure to keep
the keystore.properties file secure. This may include removing it from
your source control system.
You do not need Android Studio to sign your app. You can sign your app from
the command line using the apksigner tool or configure Gradle
to sign it for you during the build. Either way, you need to first generate
a private key using
keytool. For example:
keytool -genkey -v -keystore my-release-key.jks
-keyalg RSA -keysize 2048 -validity 10000 -alias my-alias
Note: keytool is located in the
bin/ directory in your JDK. To locate your JDK from Android Studio,
select File > Project Structure, and then click SDK Location and
you will see the JDK location.
This example prompts you for passwords for the keystore and key, and to
provide the Distinguished Name fields for your key. It then generates the
keystore as a file called my-release-key.jks, saving it in the
current directory (you can move it wherever you'd like). The keystore contains a
single key that is valid for 10,000 days.
Now you can build an unsigned APK and sign it manually or instead configure Gradle to sign your APK.
assembleRelease task:
gradlew assembleRelease
This creates an APK named module_name-unsigned.apk in
project_name/module_name/build/outputs/apk/.
The APK is unsigned and unaligned at this
point—it can't be installed until signed with your private key.
Align the unsigned APK using zipalign:
zipalign -v -p 4 my-app-unsigned.apk my-app-unsigned-aligned.apk
zipalign ensures that all uncompressed data starts with a
particular byte alignment relative to the start of the file, which
may reduce the amount of RAM consumed by an app.
Sign your APK with your private key using
apksigner:
apksigner sign --ks my-release-key.jks --out my-app-release.apk my-app-unsigned-aligned.apk
This example outputs the signed APK at my-app-release.apk
after signing it with a private key and certificate that are stored in a
single KeyStore file: my-release-key.jks.
The apksigner tool supports other signing options, including
signing an APK file using separate private key and certificate files, and
signing an APK using multiple signers. For more details, see the
apksigner
reference.
Note: To use the apksigner tool, you must
have revision 24.0.3 or higher of the Android SDK Build Tools installed.
You can update this package using the SDK Manager.
Verify that your APK is signed:
apksigner verify my-app-release.apk
build.gradle file and add the signingConfigs {} block
with entries for storeFile, storePassword,
keyAlias and keyPassword, and then pass that object
to the signingConfig property in your build type. For example:
android {
    ...
    defaultConfig { ... }
    signingConfigs {
        release {
            storeFile file("my-release-key.jks")
            storePassword "password"
            keyAlias "my-alias"
            keyPassword "password"
        }
    }
    buildTypes {
        release {
            signingConfig signingConfigs.release
            ...
        }
    }
}
Because Gradle reads paths relative to the build.gradle,
the above example works only if my-release-key.jks is in the
same directory as the build.gradle file.
Note: In this case, the keystore and key password are
visible directly in the build.gradle file. For improved security,
you should remove the signing information from your build
file.
assembleRelease task:
gradlew assembleRelease
This creates an APK named module_name-release.apk in
project_name/module_name/build/outputs/apk/.
This APK file is signed
with the private key specified in your build.gradle file and
aligned with zipalign.
And now that you've configured the release build with your
signing key, the "install" task is available for that build type. So you
can build, align, sign, and install the release APK on an emulator or device
all with the installRelease task.
An APK signed with your private key is ready for distribution, but you should first read more about how to publish your app and review the Google Play launch checklist.