
サイト内検索
Android Studio provides wizards and templates that verify your system requirements, such as the Java Development Kit (JDK) and available RAM, and configure default settings, such as an optimized default Android Virtual Device (AVD) emulation and updated system images. This document describes additional configuration settings you may want to use to customize your use of Android Studio.
Android Studio provides access to two configuration files through the Help menu:
studio.vmoptions: Customize options for Studio's
Java Virtual Machine (JVM), such as heap size and cache size. Note that on Linux machines
this file may be named studio64.vmoptions, depending on your version of Android
Studio.idea.properties: Customize Android Studio
properties, such as the plugins folder path or maximum supported file size.For specific documentation about emulator and device setup and use, see Managing Virtual Devices, Using Hardware Devices, and OEM USB Drivers.
Both configuration files are stored in the configuration folder for Android Studio. The name of
the folder depends on your Studio version. For example, Android Studio 2.2 has the folder name
AndroidStudio2.2. The location of this folder depends on your operating system:
%USERPROFILE%\.<CONFIGURATION_FOLDER>/~/Library/Preferences/<CONFIGURATION_FOLDER>/~/.<CONFIGURATION_FOLDER>/You can also use the following environment variables to point to specific override files elsewhere:
STUDIO_VM_OPTIONS: set the name and location of the .vmoptions
fileSTUDIO_PROPERTIES: set the name and location of the .properties
fileSTUDIO_JDK: set the JDK with which to run StudioThe studio.vmoptions file allows you to customize options for Android Studio's JVM.
To improve Studio's performance, the most common option to adjust is the maximum heap size, but
you can also use the studio.vmoptions file to override other default settings such as
initial heap size, cache size, and Java garbage collection switches.
To create a new studio.vmoptions file or to open your existing one, use the
following steps:
studio.vmoptions file. Click Yes to create the file.
studio.vmoptions file opens in the editor window of Android Studio. Edit the
file to add your own customized VM options. For a full list of customizable JVM options, see
Oracle's Java
HotSpot VM Options page.
The studio.vmoptions file you create gets added to the default
studio.vmoptions file, located in the bin/ directory inside your Android
Studio installation folder.
Note that you should never directly edit the studio.vmoptions file found inside the Android Studio program folder. While
you can access the file to view Studio's default VM options, editing only your own
studio.vmoptions file ensures that you don't override important default settings for
Android Studio. Therefore, in your studio.vmoptions file, override only the attributes
you care about and allow Android Studio to continue using default values for any attributes you have
not changed.
By default, Android Studio has a maximum heap size of 1280MB. If you are working on a large project, or your system has a lot of RAM, you can improve performance by increasing the maximum heap size in the VM options for Android Studio. If your system is memory-constrained, you may wish to reduce the maximum heap size.
To change the maximum heap size, follow these steps:
studio.vmoptions file.studio.vmoptions file to set
maximum heap size using the syntax -XmxheapSize.
The size you choose should be based on the size of your project and the
available RAM on your machine. As a baseline, if you have more than 4GB of
RAM and a medium-sized project, you should set the maximum heap size to 2GB
or more. The following line sets the maximum heap size to 2GB:
-Xmx2g
studio.vmoptions file, and restart Android Studio for
your changes to take effect.
jps -lvm
You will see a list of the instrumented JVMs running on your machine, including the full package
name for each and the arguments passed in. Locate the item corresponding to your instance of
Android Studio. It should end with -Didea.paths.selector=AndroidStudio[Version].
You should see two arguments beginning with -Xmx for this JVM, one with the default
value of 1280mb, and one with your new value, as shown in figure 1.
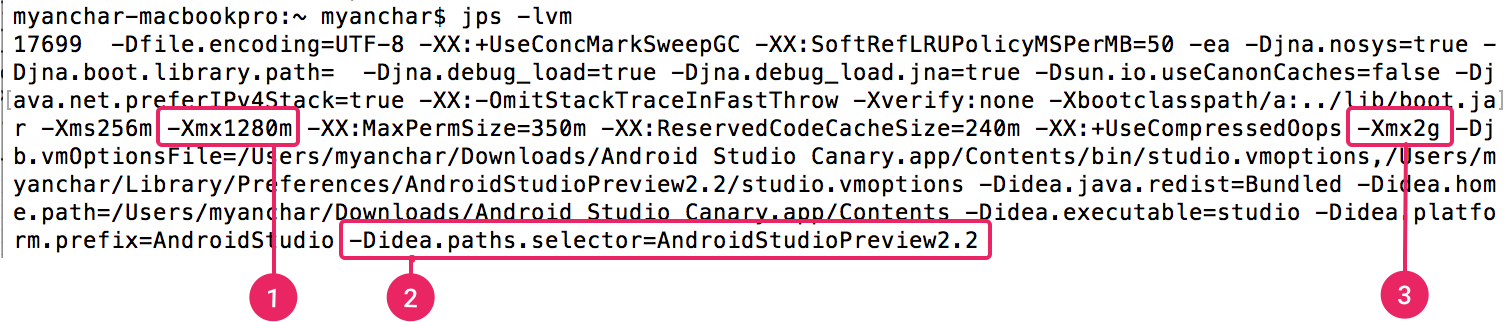
Figure 1. The terminal output showing the current arguments for Android Studio's JVM.
-Xmx argument showing the default maximum heap size, in this case 1280m.
-Didea.paths.selector showing the version of Android Studio currently
running.
-Xmx argument showing the new custom maximum heap size. Note that this is
followed by the location the custom studio.vmoptions file you created above.
You can export a settings JAR file (Settings.jar) that contains
all or a subset of your preferred IDE settings for a project. You can then import the JAR file
into your other projects and/or make the JAR file available to your colleagues to import into
their projects.
For more information, see Exporting and Importing Settings at IntelliJ IDEA.
The idea.properties file allows you to customize IDE properties for Android Studio,
such as the path to user installed plugins and the maximum file size supported by the IDE. The
idea.properties file gets merged with the default properties for the IDE so you can
specify just the override properties.
To create a new idea.properties file or to open your existing file, use the
following steps:
idea.properties file. Click Yes to create the file.
idea.properties file opens in the editor window of Android Studio. Edit the
file to add your own customized IDE properties.
The following idea.properties file includes the commonly customized IDE properties.
For a complete list of properties, read about the idea.properties file for IntelliJ IDEA.
#---------------------------------------------------------------------
# Uncomment this option if you want to customize path to user installed plugins folder. Make sure
# you're using forward slashes.
#---------------------------------------------------------------------
# idea.plugins.path=${idea.config.path}/plugins
#---------------------------------------------------------------------
# Maximum file size (kilobytes) IDE should provide code assistance for.
# The larger file is the slower its editor works and higher overall system memory requirements are
# if code assistance is enabled. Remove this property or set to very large number if you need
# code assistance for any files available regardless their size.
#---------------------------------------------------------------------
idea.max.intellisense.filesize=2500
#---------------------------------------------------------------------
# This option controls console cyclic buffer: keeps the console output size not higher than the
# specified buffer size (Kb). Older lines are deleted. In order to disable cycle buffer use
# idea.cycle.buffer.size=disabled
#---------------------------------------------------------------------
idea.cycle.buffer.size=1024
#---------------------------------------------------------------------
# Configure if a special launcher should be used when running processes from within IDE.
# Using Launcher enables "soft exit" and "thread dump" features
#---------------------------------------------------------------------
idea.no.launcher=false
#---------------------------------------------------------------------
# To avoid too long classpath
#---------------------------------------------------------------------
idea.dynamic.classpath=false
#---------------------------------------------------------------------
# There are two possible values of idea.popup.weight property: "heavy" and "medium".
# If you have WM configured as "Focus follows mouse with Auto Raise" then you have to
# set this property to "medium". It prevents problems with popup menus on some
# configurations.
#---------------------------------------------------------------------
idea.popup.weight=heavy
#---------------------------------------------------------------------
# Use default anti-aliasing in system, i.e. override value of
# "Settings|Editor|Appearance|Use anti-aliased font" option. May be useful when using Windows
# Remote Desktop Connection for instance.
#---------------------------------------------------------------------
idea.use.default.antialiasing.in.editor=false
#---------------------------------------------------------------------
# Disabling this property may lead to visual glitches like blinking and fail to repaint
# on certain display adapter cards.
#---------------------------------------------------------------------
sun.java2d.noddraw=true
#---------------------------------------------------------------------
# Removing this property may lead to editor performance degradation under Windows.
#---------------------------------------------------------------------
sun.java2d.d3d=false
#---------------------------------------------------------------------
# Workaround for slow scrolling in JDK6
#---------------------------------------------------------------------
swing.bufferPerWindow=false
#---------------------------------------------------------------------
# Removing this property may lead to editor performance degradation under X Window.
#---------------------------------------------------------------------
sun.java2d.pmoffscreen=false
#---------------------------------------------------------------------
# Workaround to avoid long hangs while accessing clipboard under Mac OS X.
#---------------------------------------------------------------------
# ide.mac.useNativeClipboard=True
#---------------------------------------------------------------------
# Maximum size (kilobytes) IDEA will load for showing past file contents -
# in Show Diff or when calculating Digest Diff
#---------------------------------------------------------------------
# idea.max.vcs.loaded.size.kb=20480
If you are running Android Studio on a machine with less than the recommended specifications (see System Requirements), you can customize the IDE to improve performance on your machine, as follows:
javaMaxHeapSize for DEX file compilation to
200m. For more information, see Improve build times by
configuring DEX resources.
Instant Run is a behavior for the Run  and
Debug
and
Debug  commands that significantly reduces the time
between updates to your app. Although your first build may take longer to
complete, Instant Run pushes subsequent updates to your app without building
a new APK, so changes are visible much more quickly.
commands that significantly reduces the time
between updates to your app. Although your first build may take longer to
complete, Instant Run pushes subsequent updates to your app without building
a new APK, so changes are visible much more quickly.
Android Studio enables Instant Run by default for projects built using Android plugin for Gradle 2.0.0 and higher. You can improve build performance with Instant Run by modifying a few settings for your project. For more information about configuring your project for Instant Run, read Configure and optimize your project for Instant Run.
A copy of the latest OpenJDK comes bundled with Android Studio 2.2 and higher, and this is the JDK version we recommend you use for your Android projects. To use the bundled JDK, proceed as follows:
By default, the Java language version used to compile your project is based on your project's
compileSdkVersion (because different versions of Android support different
versions of Java). If necessary, you can override this default Java version by adding the
following CompileOptions {} block to your build.gradle file:
android {
    compileOptions {
        sourceCompatibility JavaVersion.VERSION_1_6
        targetCompatibility JavaVersion.VERSION_1_6
    }
}
For more information about where compileSdkVersion is defined, read about the module-level build file.
Proxies serve as intermediary connection points between HTTP clients and web servers that add security and privacy to internet connections.
To support running Android Studio behind a firewall, set the proxy settings for the Android Studio IDE. Use the Android Studio IDE HTTP Proxy settings page to set the HTTP proxy settings for Android Studio.
When running the Android plugin for Gradle from the command line or on machines where Android Studio is not installed, such as continuous integration servers, set the proxy settings in the Gradle build file.
Note: After the initial installation of the Android Studio bundle, Android Studio can run with internet access or off-line. However, Android Studio requires an internet connection for Setup Wizard synchronization, 3rd-party library access, access to remote repositories, Gradle initialization and synchronization, and Android Studio version updates.
Android Studio supports HTTP proxy settings so you can run Android Studio behind a firewall or secure network. To set the HTTP proxy settings in Android Studio:
When running the Android plugin from the command line or on machines where Android Studio is not installed, set the Android plugin for Gradle proxy settings in the Gradle build file.
For application-specific HTTP proxy settings, set the proxy settings in the
build.gradle file as required for each application module.
apply plugin: 'com.android.application'

android {
    ...

    defaultConfig {
        ...
        systemProp.http.proxyHost=proxy.company.com
        systemProp.http.proxyPort=443
        systemProp.http.proxyUser=userid
        systemProp.http.proxyPassword=password
        systemProp.http.auth.ntlm.domain=domain
    }
    ...
}
For project-wide HTTP proxy settings, set the proxy settings in the
gradle/gradle.properties file.
# Project-wide Gradle settings.
...

systemProp.http.proxyHost=proxy.company.com
systemProp.http.proxyPort=443
systemProp.http.proxyUser=username
systemProp.http.proxyPassword=password
systemProp.http.auth.ntlm.domain=domain

systemProp.https.proxyHost=proxy.company.com
systemProp.https.proxyPort=443
systemProp.https.proxyUser=username
systemProp.https.proxyPassword=password
systemProp.https.auth.ntlm.domain=domain

...
For information about using Gradle properties for proxy settings, see the Gradle User Guide.
Note: When using Android Studio, the settings in the Android Studio IDE HTTP proxy settings page override the HTTP proxy settings in the gradle.properties file.