
サイト内検索
An Android Virtual Device (AVD) definition lets you define the characteristics of an Android phone, tablet, Android Wear, or Android TV device that you want to simulate in the Android Emulator. The AVD Manager helps you easily create and manage AVDs.
An AVD contains a hardware profile, system image, storage area, skin, and other properties.
The hardware profile defines the characteristics of a device as shipped from the factory. The AVD Manager comes preloaded with certain hardware profiles, such as Nexus phone devices, and you can define and import hardware profiles as needed. You can override some of the settings in your AVD, if needed.
To effectively test your app, you should create an AVD that models each device type that your app is designed to support.
The AVD Manager helps you choose a system image for your AVD by providing recommendations. It also lets you download system images, some with add-on libraries, like Google APIs, which your app might require. x86 system images run the fastest in the emulator. Android Wear and Android TV devices tend to run best (and have the largest installed base) on recent releases, while users of Android phones and tablets tend to use slightly older releases, as shown in the API level dashboards.
We recommend that you create an AVD for each API level that your app could potentially support
based on the
<uses-sdk>
setting in your manifest. For example, you might want to test with all
API levels that are equal to and higher than the
minSdkVersion setting.
By testing with API levels higher than required by your app, you ensure app
forward-compatibility when users download system updates.
The AVD has a dedicated storage area on your development machine. It stores the device user data, such as installed apps and settings, as well as an emulated SD card. If needed, you can use the AVD Manager to wipe user data, so the device has the same data as if it were new.
An emulator skin specifies the appearance of a device. The AVD Manager provides some predefined skins. You can also define your own, or use skins provided by third parties.
Just as with a real device, for apps to use certains features defined in an
AVD, such as the camera, it must have the corresponding
<uses-feature>
setting in the app manifest. See Hardware Profile Properties and
AVD Properties for lists of features you can define in your AVDs.
The AVD Manager lets you manage your AVDs all in one place.
To run the AVD Manager, do one of the following:
 in the toolbar.
The AVD Manager appears.
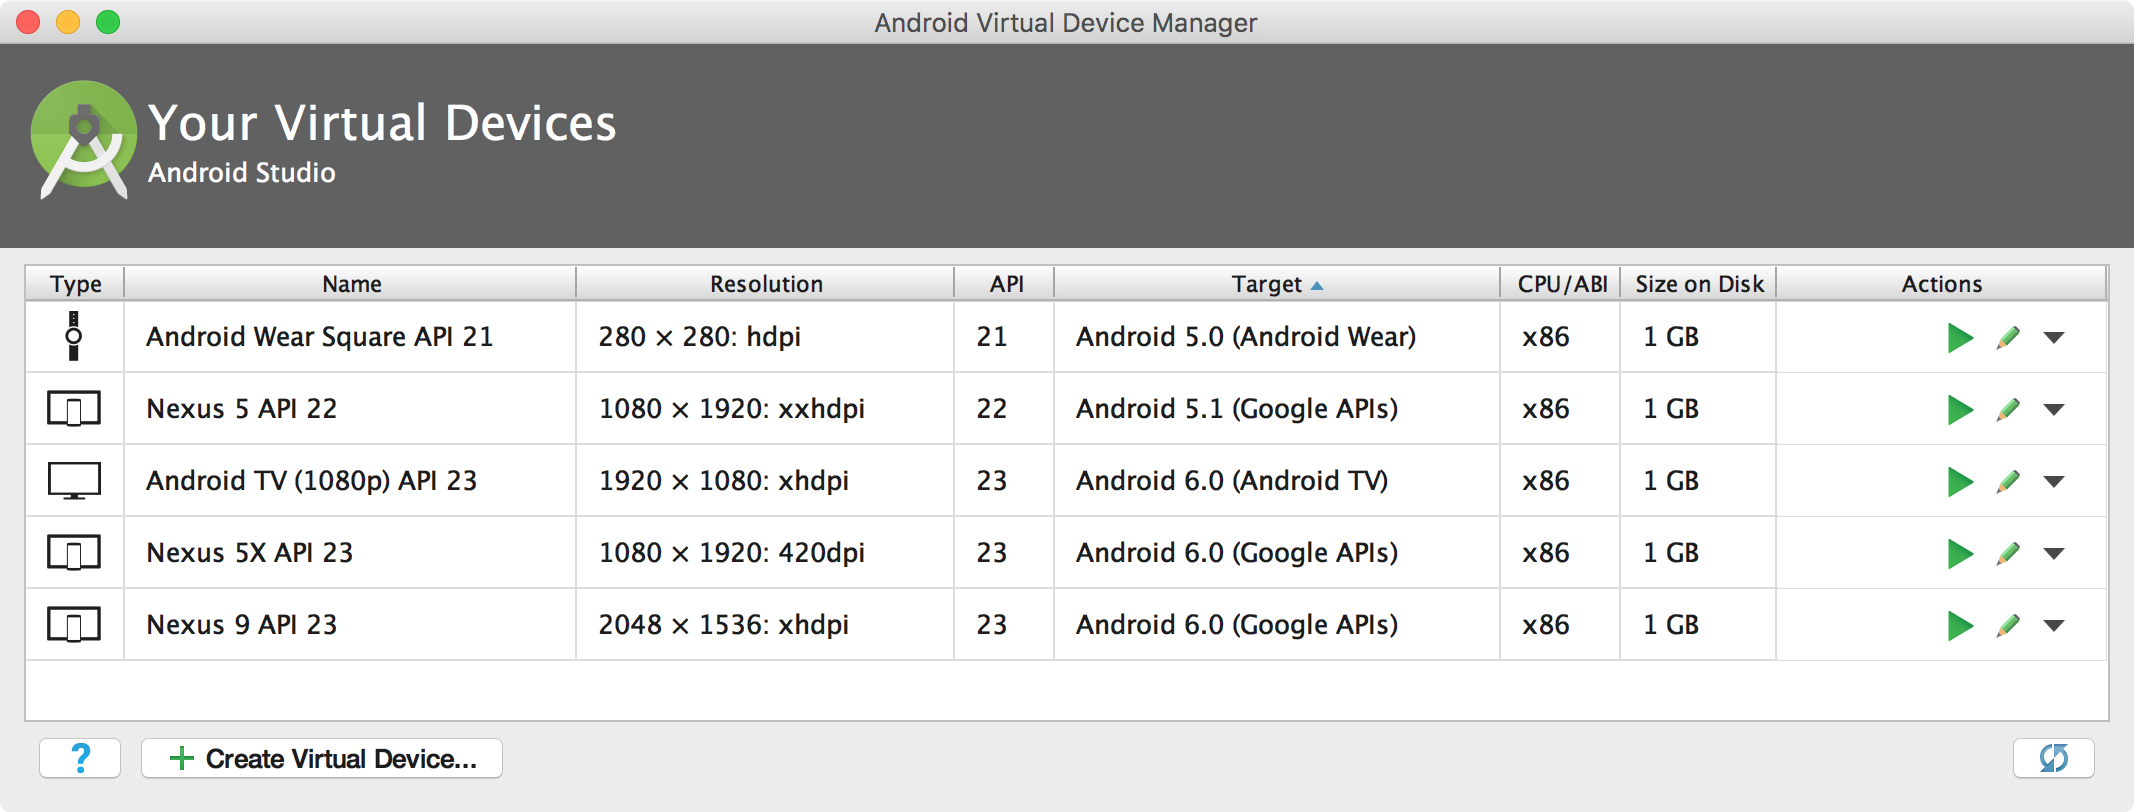
It displays any AVDs you’ve already defined. When you first install Android Studio, it creates one AVD. If you defined AVDs for Android Emulator 24.0.x or lower, you need to recreate them.
From this page you can:
.ini and
.img files on disk.You can create a new AVD from the beginning, or duplicate an AVD and change some properties.
To create a new AVD:
Alternatively, run your app from within Android Studio. In the Select Deployment Target dialog, click Create New Emulator.
The Select Hardware page appears.
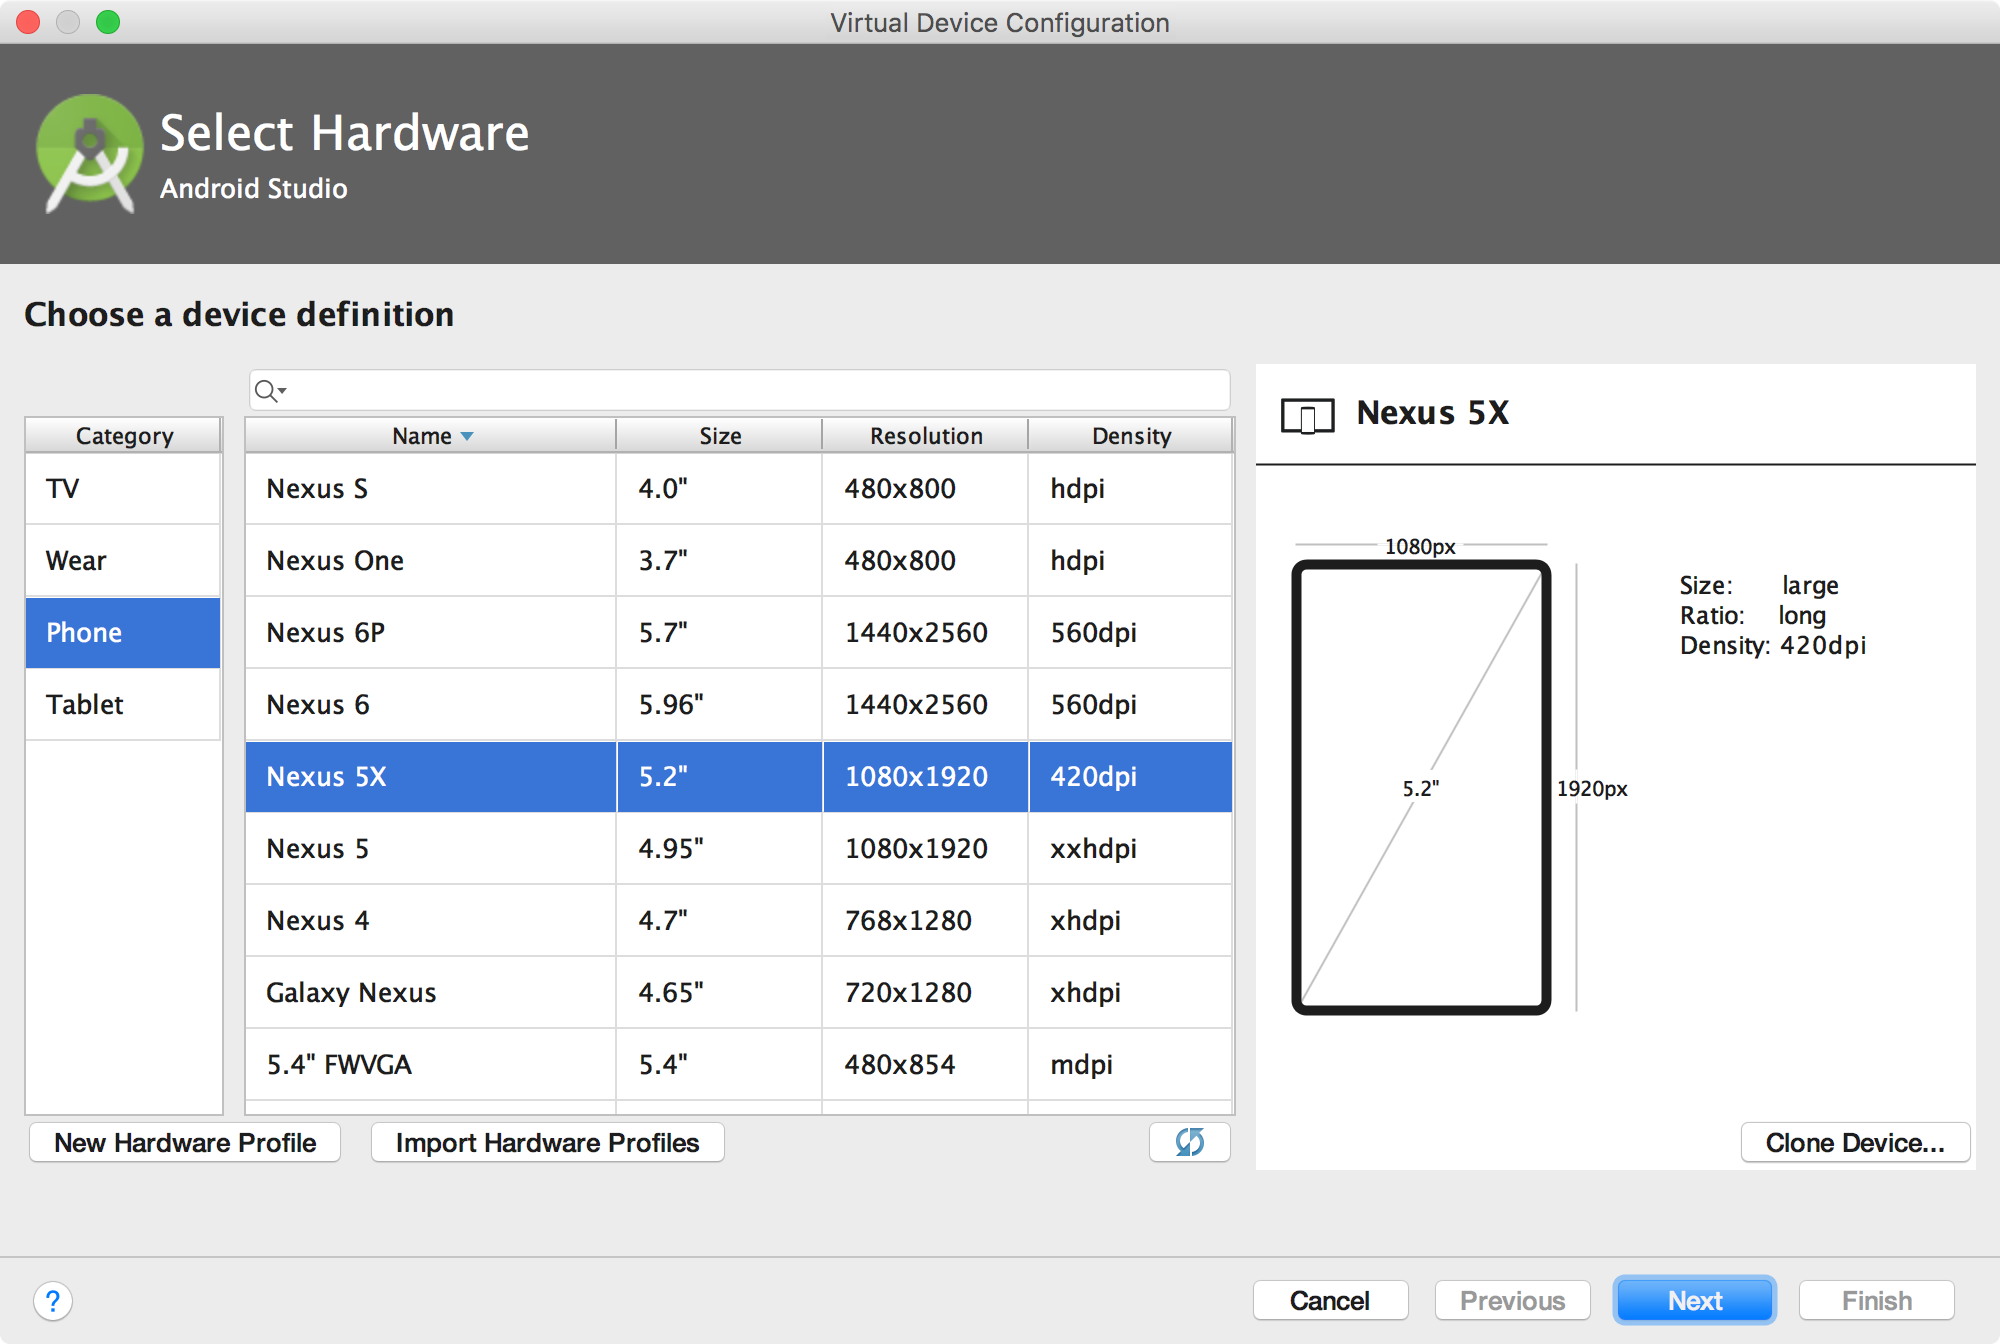
If you don't see the hardware profile you want, you can create or import a hardware profile.
The System Image page appears.
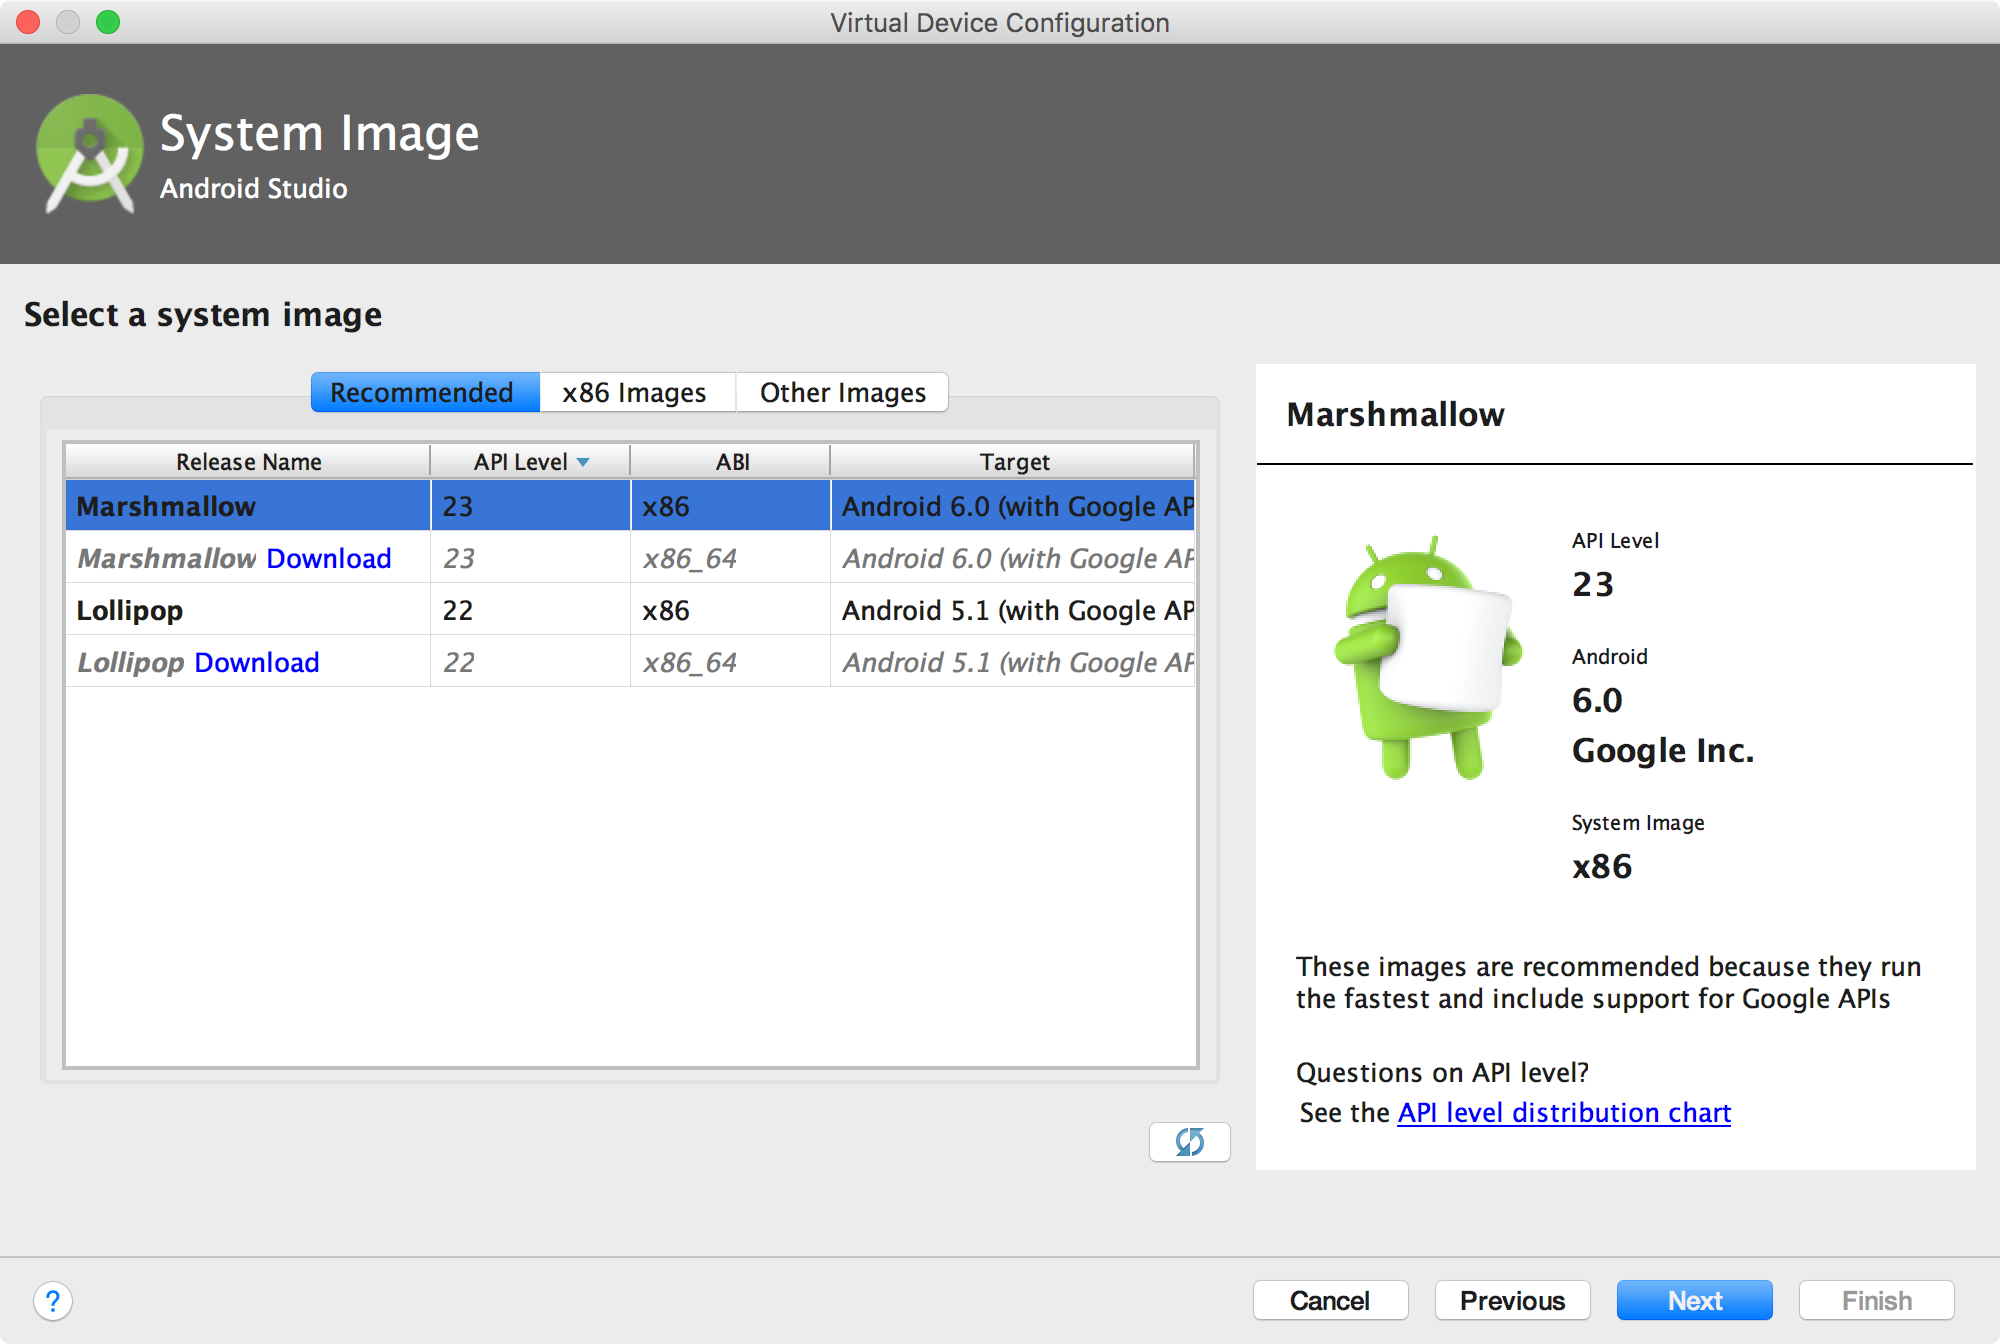
The Recommended tab lists recommended system images. The other tabs include a more complete list. The right pane describes the selected system image. x86 images run the fastest in the emulator.
If you see Download next to the system image, you need to click it to download the system image. You must be connected to the internet to download it.
The API level of the target device is important, because your app
won't be able to run
on a system image with an API level that's less than that required by
your app, as specified
in the
minSdkVersion attribute of the app manifest file. For more
information about the relationship between system API level and
minSdkVersion, see Versioning Your Apps.
If your app declares a
<uses-library>
element in the manifest file, the app requires a system image in which that external
library is present. If you want to run your app on an emulator, create an AVD that
includes the required library. To do so, you might need to use an add-on component for the
AVD platform; for example, the Google APIs add-on contains the Google Maps library.
The Verify Configuration page appears.
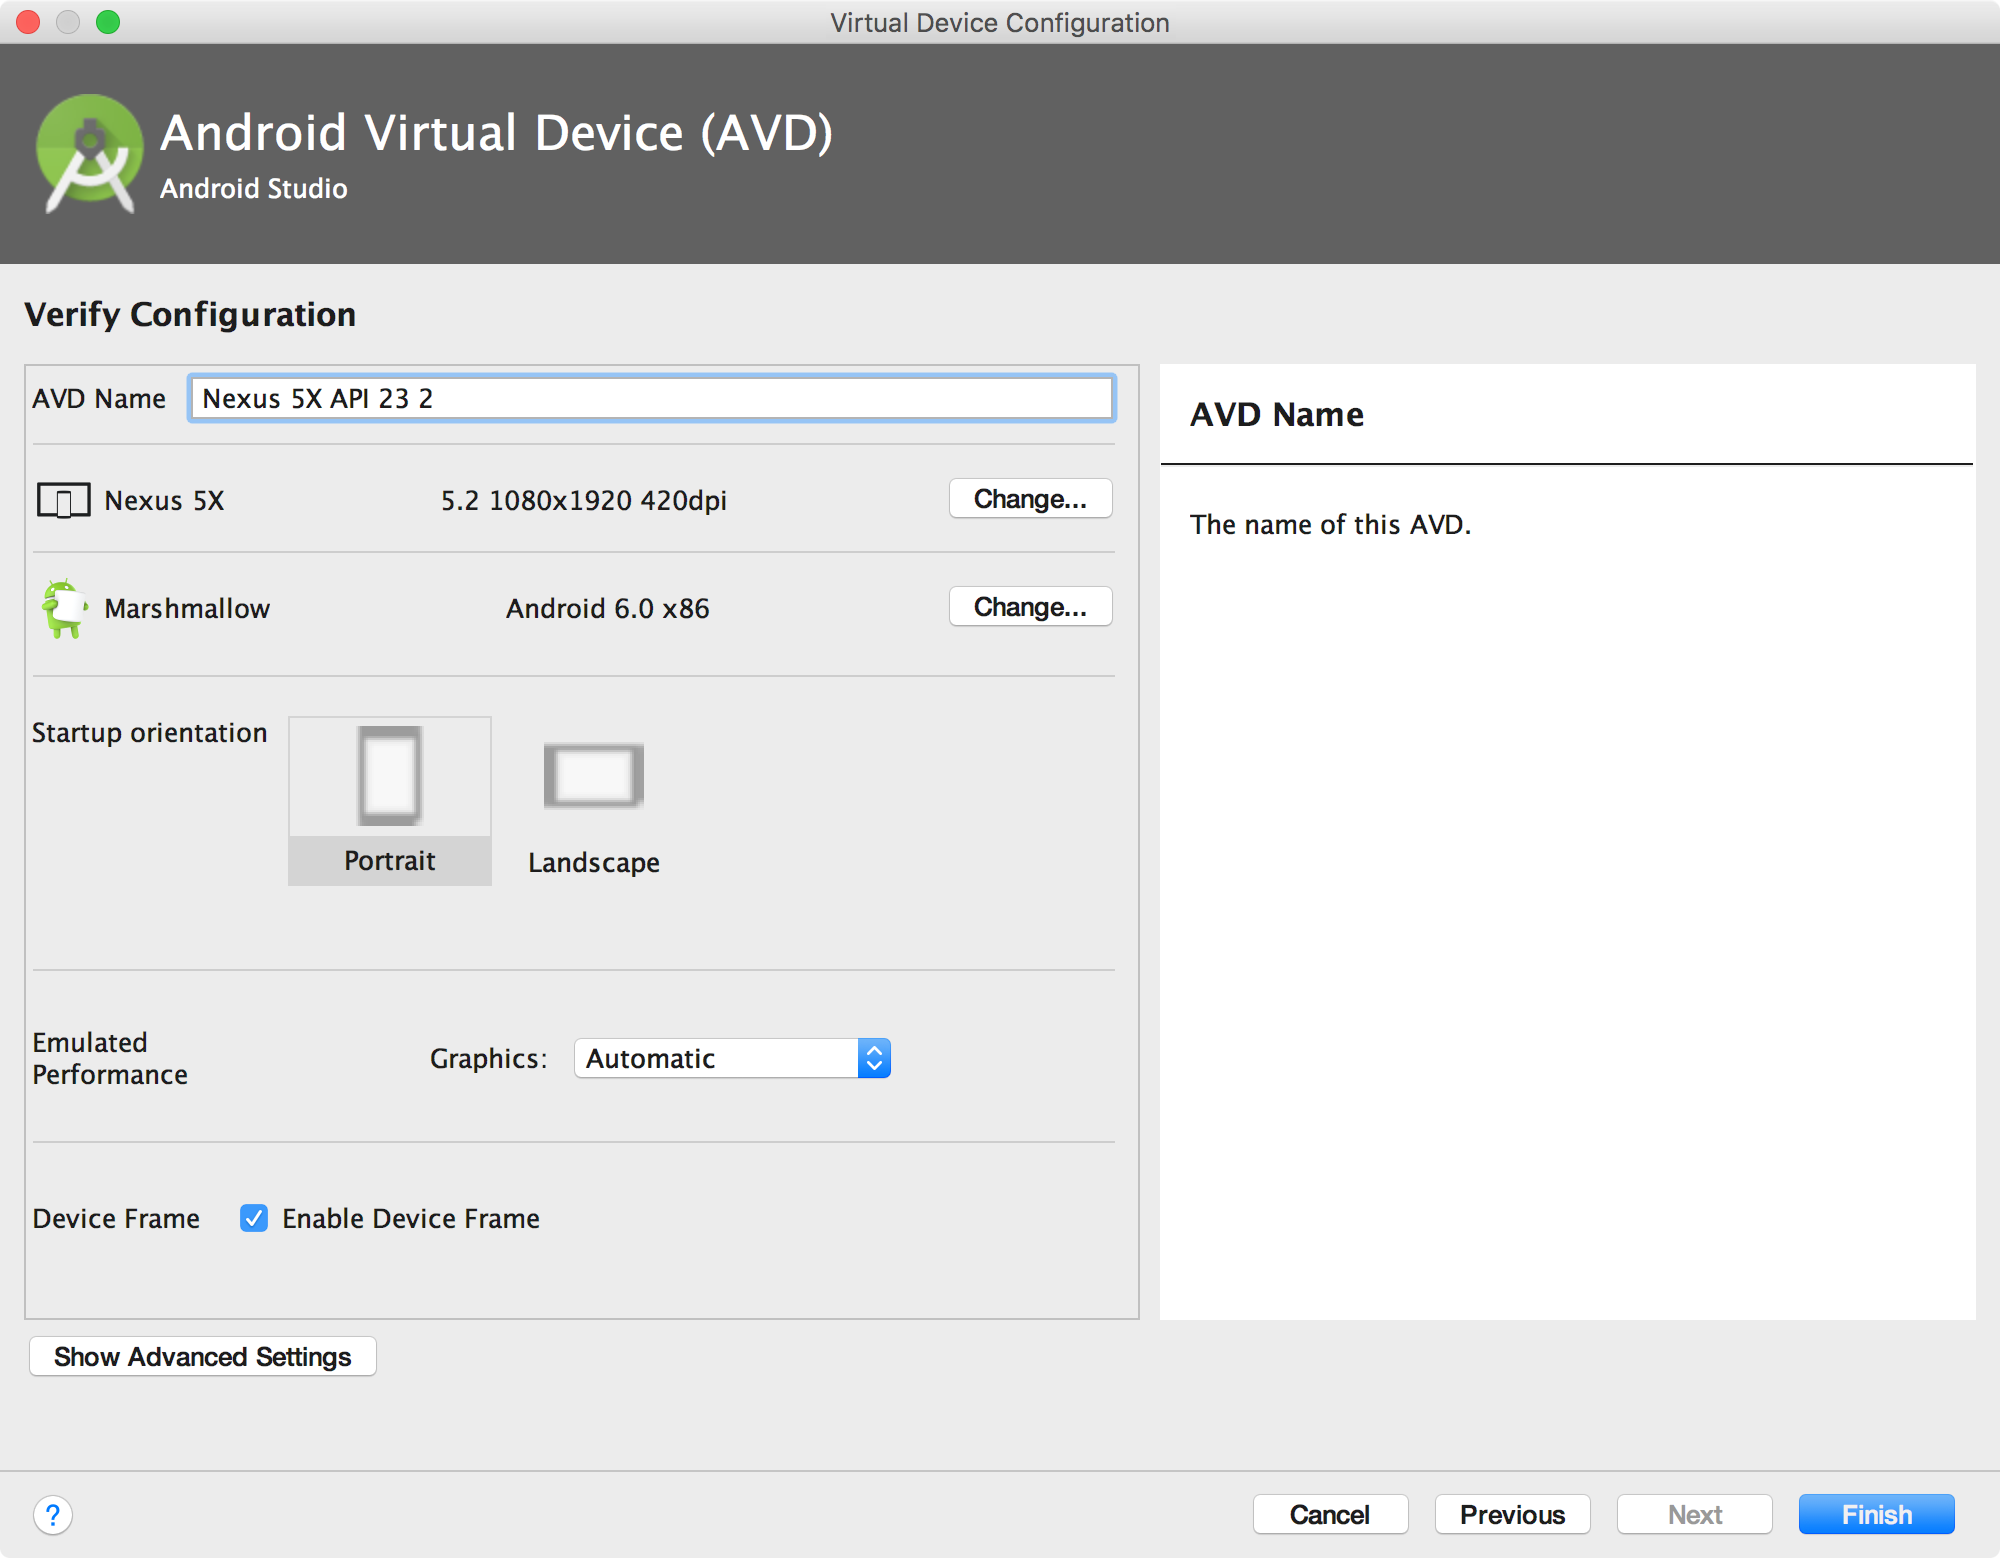
Click Show Advanced Settings to show more settings, such as the skin.
The new AVD appears in the Your Virtual Devices page or the Select Deployment Target dialog.
To create an AVD starting with a copy:
Or click Menu
![]() and select Duplicate.
and select Duplicate.
The Verify Configuration page appears.
The AVD appears in the Your Virtual Devices page.
The AVD Manager provides predefined hardware profiles for common devices so you can easily add them to your AVD definitions. If you need to define a different device, you can create a new hardware profile. You can define a new hardware profile from the beginning, or copy a hardware profile as a start. The preloaded hardware profiles aren't editable.
To create a new hardware profile from the beginning:
Your new hardware profile appears in the Select Hardware page. You can optionally create an AVD that uses the hardware profile by clicking Next. Or, click Cancel to return to the Your Virtual Devices page or Select Deployment Target dialog.
To create a hardware profile starting with a copy:
Or right-click a hardware profile and select Clone.
Your new hardware profile appears in the Select Hardware page. You can optionally create an AVD that uses the hardware profile by clicking Next. Or, click Cancel to return to the Your Virtual Devices page or Select Deployment Target dialog.
From the Your Virtual Devices page, you can perform the following operations on an existing AVD:
.ini and
.img files on disk, right-click an AVD and select
Show on Disk. Or click Menu
From the Select Hardware page, you can perform the following operations on an existing hardware profile:
You can't edit or delete the predefined hardware profiles.
From the Your Virtual Devices page, you can perform the following operations on an emulator:
 .
.From the Select Hardware page, you can import and export hardware profiles:
You can specify the following properties of hardware profiles in the Configure Hardware Profile page. AVD configuration properties override hardware profile properties, and emulator properties that you set while the emulator is running override them both.
The predefined hardware profiles included with the AVD Manager aren't editable. However, you can copy them and edit the copies.
| Hardware Profile Property | Description |
|---|---|
| Device Name | Name of the hardware profile. The name can contain uppercase or lowercase letters, numbers from 0 to 9, periods (.), underscores (_), parentheses ( () ), and spaces. The name of the file storing the hardware profile is derived from the hardware profile name. |
| Device Type | Select one of the following:
|
| Screen Size | The physical size of the screen, in inches, measured at the diagonal. If the size is larger than your computer screen, it’s reduced in size at launch. |
| Screen Resolution | Type a width and height in pixels to specify the total number of pixels on the simulated screen. |
| Round | Select this option if the device has a round screen, such as some Android Wear devices. |
| Memory: RAM | Type a RAM size for the device and select the units, one of B (byte), KB (kilobyte), MB (megabyte), GB (gigabyte), or TB (terabyte). |
| Input: Has Hardware Buttons (Back/Home/Menu) | Select this option if your device has hardware navigation buttons. Deselect it if these buttons are implemented in software only. If you select this option, the buttons won’t appear on the screen. You can use the emulator side panel to “press” the buttons, in either case. |
| Input: Has Hardware Keyboard | Select this option if your device has a hardware keyboard. Deselect it if it doesn’t. If you select this option, a keyboard won’t appear on the screen. You can use your computer keyboard to send keystrokes to the emulator, in either case. |
| Navigation Style | Select one of the following:
These options are for actual hardware controls on the device itself. However, the events sent to the device by an external controller are the same. |
| Supported Device States | Select one or both options:
If you select both, you can switch between orientations in the emulator. You must select at least one option to continue. |
| Cameras | To enable the camera, select one or both options:
Later, you can use a webcam or a photo provided by the emulator to simulate taking a photo with the camera. |
| Sensors: Accelerometer | Select if the device has hardware that helps the device determine its orientation. |
| Sensors: Gyroscope | Select if the device has hardware that detects rotation or twist. In combination with an accelerometer, it can provide smoother orientation detection and support a six-axis orientation system. |
| Sensors: GPS | Select if the device has hardware that supports the Global Positioning System (GPS) satellite-based navigation system. |
| Sensors: Proximity Sensor | Select if the device has hardware that detects if the device is close to your face during a phone call to disable input from the screen. |
| Default Skin | Select a skin that controls what the device looks like when displayed in the emulator. Remember that specifying a screen size that's too big for the resolution can mean that the screen is cut off, so you can't see the whole screen. See Creating Emulator Skins for more information. |
You can specify the following properties for AVD configurations in the Verify Configuration page. The AVD configuration specifies the interaction between the development computer and the emulator, as well as properties you want to override in the hardware profile.
AVD configuration properties override hardware profile properties. Emulator properties that you set while the emulator is running override them both.
| AVD Property | Description |
|---|---|
| AVD Name | Name of the AVD. The name can contain uppercase or lowercase letters, numbers from 0 to 9, periods (.), underscores (_), parentheses ( () ), dashes (-), and spaces. The name of the file storing the AVD configuration is derived from the AVD name. |
| AVD ID (Advanced) | The AVD filename is derived from the ID, and you can use the ID to refer to the AVD from the command line. |
| Hardware Profile | Click Change to select a different hardware profile in the Select Hardware page. |
| System Image | Click Change to select a different system image in the System Image page. An active internet connection is required to download a new image. |
| Startup Orientation | Select one option for the initial emulator orientation:
An option is enabled only if it’s selected in the hardware profile. When running the AVD in the emulator, you can change the orientation if both portrait and landscape are supported in the hardware profile. |
| Camera (Advanced) | To enable a camera, select one or both options:
The Emulated setting produces a software-generated image, while the Webcam setting uses your development computer webcam to take a picture. This option is available only if it's selected in the hardware profile; it's not available for Android Wear and Android TV. |
| Network: Speed (Advanced) | Select a network protocol to determine the speed of data transfer:
|
| Network: Latency (Advanced) | Select a network protocol to set how much time (delay) it takes for the protocol to transfer a data packet from one point to another point. |
| Emulated Performance: Graphics | Select how graphics are rendered in the emulator:
|
| Multi-Core CPU (Advanced) | Select the number of processor cores on your computer that you’d like to use for the emulator. Using more processor cores speeds up the emulator. |
| Memory and Storage: RAM | The amount of RAM on the device. This value is set by the hardware manufacturer, but you can override it, if needed, such as for faster emulator operation. Increasing the size uses more resources on your computer. Type a RAM size and select the units, one of B (byte), KB (kilobyte), MB (megabyte), GB (gigabyte), or TB (terabyte). |
| Memory and Storage: VM Heap | The VM heap size. This value is set by the hardware manufacturer, but you can override it, if needed. Type a heap size and select the units, one of B (byte), KB (kilobyte), MB (megabyte), GB (gigabyte), or TB (terabyte). For more information on Android VMs, see Memory Management for Different Virtual Machines. |
| Memory and Storage: Internal Storage | The amount of nonremovable memory space available on the device. This value is set by the hardware manufacturer, but you can override it, if needed. Type a size and select the units, one of B (byte), KB (kilobyte), MB (megabyte), GB (gigabyte), or TB (terabyte). |
| Memory and Storage: SD Card | The amount of removable memory space available to store data on the device. To use a virtual SD card managed by Android Studio, select Studio-managed, type a size, and select the units, one of B (byte), KB (kilobyte), MB (megabyte), GB (gigabyte), or TB (terabyte). A minimum of 100 MB is recommended to use the camera. To manage the space in a file, select External file and click ... to specify the file and location. For more information, see mksdcard. |
| Device Frame: Enable Device Frame | Select to enable a frame around the emulator window that mimics the look of a real device. |
| Custom Skin Definition (Advanced) | Select a skin that controls what the device looks like when displayed in the emulator. Remember that specifying a screen size that's too big for the skin can mean that the screen is cut off, so you can't see the whole screen. See Creating Emulator Skins for more information. |
| Keyboard: Enable Keyboard Input (Advanced) | Select this option if you want to use your hardware keyboard to interact with the emulator. It's disabled for Android Wear and Android TV. |
An Android emulator skin is a collection of files that define the visual and control elements of an emulator display. If the skin definitions available in the AVD settings don't meet your requirements, you can create your own custom skin definition, and then apply it to your AVD.
Each emulator skin contains:
hardware.ini fileTo create and use a custom skin:
layout. This file defines many characteristics of the skin,
such as the
size and image assets for specific buttons. For example:
parts {
    device {
        display {
            width   320
            height  480
            x       0
            y       0
        }
    }

    portrait {
        background {
            image background_port.png
        }

        buttons {
            power {
                image  button_vertical.png
                x 1229
                y 616
            }
        }
    }
    ...
}
hardware.ini
file for the device settings, such as hw.keyboard and
hw.lcd.density.For more detailed information about creating emulator skins, see the Android Emulator Skin File Specification in the tools source code.