
サイト内検索
Once you install Android Studio, it's easy to keep the Android Studio IDE and Android SDK tools up to date with automatic updates and the Android SDK Manager.
Android Studio notifies you with a small bubble dialog when an update is available for the IDE, but you can manually check for updates by clicking Help > Check for Update (on Mac, Android Studio > Check for Updates).
Updates for Android Studio are available from the following release channels:
By default, Android Studio offers updates from the Stable Channel. If you'd like to try one of the other versions of Android Studio—known collectively as the Preview Channels—you can choose to receive updates from one of those instead.
To change your update channel, proceed as follows:
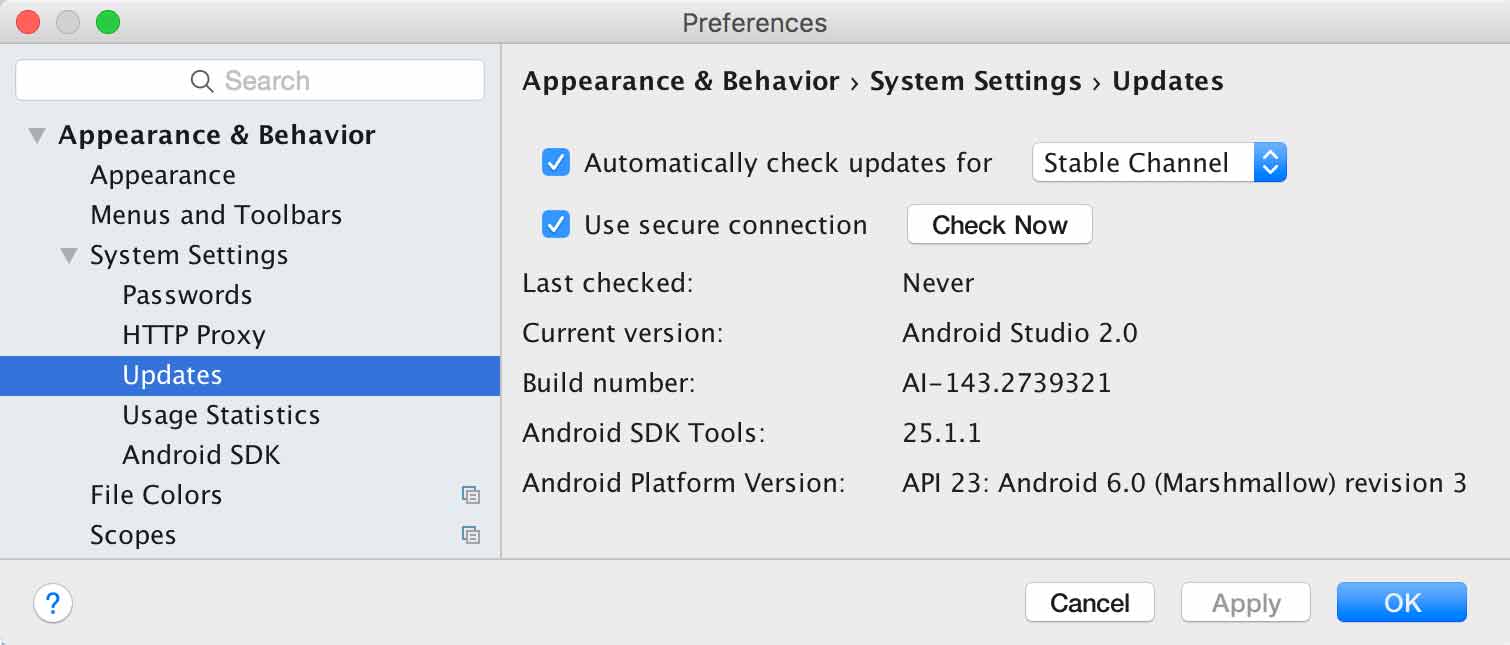
Figure 1. The Android Studio Updates preferences.
If you'd like to try one of the preview channels (Canary, Dev, or Beta) while still using the Stable build for your production Android projects, you can safely install a second version of Android Studio by downloading the preview build from tools.android.com.
The Android SDK Manager provides the SDK tools, platforms, and other components you need to develop your apps.
To open the SDK Manager, click Tools > Android >
SDK Manager or click SDK Manager
 in the toolbar.
When an update is available for a package you already have, a dash
![]() appears in the check box next to the package.
appears in the check box next to the package.
Pending updates are indicated in the left column with a download icon
![]() . Pending removals are
indicated with a red cross
. Pending removals are
indicated with a red cross ![]() .
.
To update the selected packages, click Apply or OK, then agree to any license agreements.
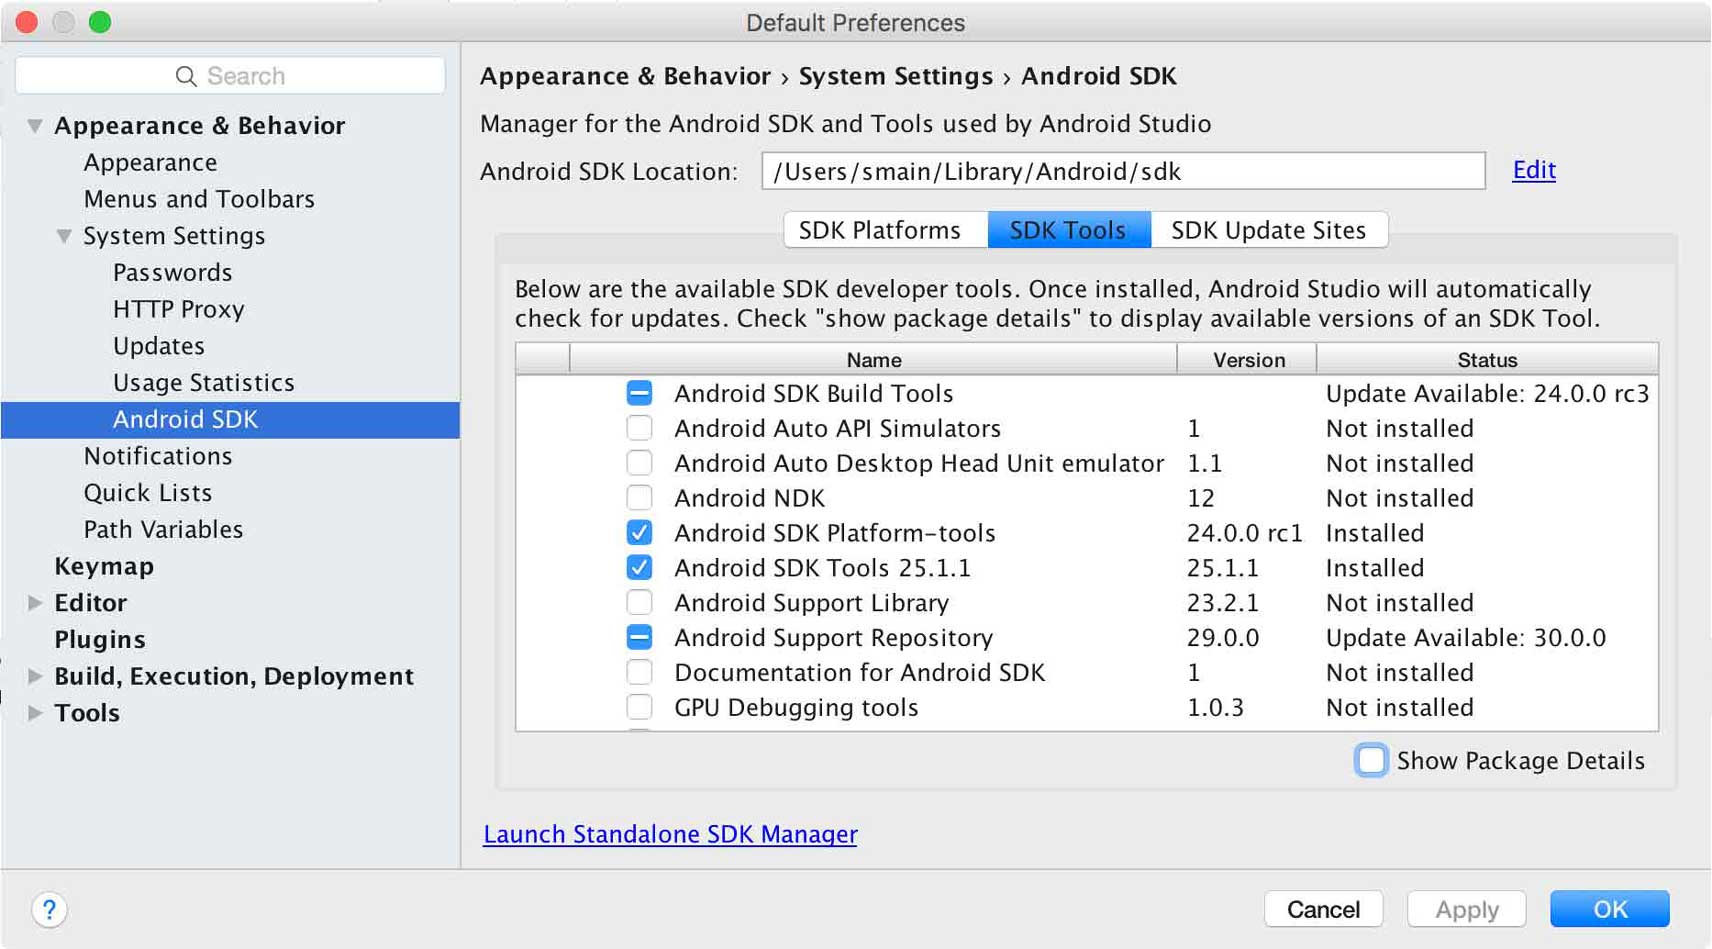
Figure 2. The Android SDK Manager.
You should give special consideration to the following tools in the SDK Tools tab:
In the SDK Platforms tab, you must also install at least one version of the Android platform. Each version provides several different packages. To download only those that are required, click the check box next to the version name.
To see all available packages for each Android platform, click Show Package Details at the bottom of the window. Within each platform version, you'll find the following packages:
Note: If you plan to use APIs from Google Play services, you must use the Google APIs System Image.
The above list is not comprehensive and you can add other sites to download additional packages from third parties.
In some cases, an SDK package may require a specific minimum revision of another tool. If so, the SDK Manager notifies you with a warning and adds the dependencies to your list of downloads.
Tip: You can also customize the
build.gradle file so each project uses a specific build chain and
compilation options. For more information see, Configuring Gradle Builds.
To manage which SDK sites Android Studio checks for Android tools and third party tool updates, click the SDK Update Sites tab. You can add other sites that host their own tools, then download the packages from those sites.
For example, a mobile carrier or device manufacturer might offer additional API libraries that are supported by their own Android-powered devices. To develop using their libraries, you can install their Android SDK package by adding their SDK tools URL to the SDK Manager in the SDK Update Sites.
If a carrier or device manufacturer has hosted an SDK add-on repository file on their website, follow these steps to add their site to the Android SDK Manager:
 at the
bottom of the window.
at the
bottom of the window.Any SDK packages available from the site now appear in the SDK Platforms or SDK Tools tabs, as appropriate.
When you run a build from the command line, Gradle can automatically download missing SDK packages that a project depends on, as long as the corresponding SDK license agreements have already been accepted using the SDK Manager.
When you accept the license agreements using the SDK Manager, Android Studio creates a licenses directory inside the SDK home directory. This licenses directory is necessary for Gradle to auto-download missing packages.
Note: Accepting the license agreements using the
android command line tool does not create this licenses directory.
You must first accept the agreements using the SDK Manager to be able to use
this feature.
If you have accepted the license agreements on one workstation, but wish to build your projects on a different one, you can export your licenses by copying over the accepted licenses directory. To copy the licenses to another machine, follow these steps:
licenses/ directory
inside it. (If you do not see a licenses/ directory, return to
Android Studio and update your SDK tools, making sure to accept the license
agreements. When you return to the Android SDK home directory, you should now
see the directory.)
licenses/ directory and paste it into the
Android SDK home directory on the machine where you wish to build your
projects.
Gradle will now be able to automatically download missing packages your project depends on.
Note that this feature is automatically disabled for builds you run from
Android Studio, as the SDK manager handles downloading missing packages for
the IDE. You can also manually disable this feature by setting
android.builder.sdkDownload=false in the
gradle.properties file for your project.