A project in Android Studio contains everything that defines your
workspace for an app, from source code and assets, to test code and build
configurations. When you start a new project, Android Studio creates the necessary
structure for all your files and makes them visible in the
Project window on the left side of the IDE (click View
> Tool Windows > Project). This page provides an overview of the
key components inside your project.
Android Studio を使って Google Cloud module の作成や開発を行うことで、同一プロジェクト内で アプリ用のコード と バックエンド用コードを管理できます。
また、バックエンド用コードの実行やテストもローカルで行ったり、Android Studioを使って Google Cloud moduleをデプロイすることも出来ます。
A module is a collection of source files and build settings that
allow you to divide your project into discrete units of functionality. Your
project can have one or many modules and one module may use another module as a
dependency. Each module can be independently built, tested, and debugged.
Additional modules are often useful when creating code libraries within your
own project or when you want to create different sets of code and resources for
different device types, such as phones and wearables, but keep all the files
scoped within the same project and share some code.
You can add a new module to your project by clicking File
> New > New Module.
Android Studio offers a few distinct types of module:
Android app module
Provides a container for your app's
source code, resource files, and app level settings such as the
module-level build file and Android Manifest file. When
you create a new project, the default module name is "app".
In the Create New Module window, Android Studio offers
the following app modules:
Phone & Tablet Module
Android Wear Module
Android TV Module
Glass Module
They each provide essential files and some code templates that are
appropriate for the corresponding app or device type.
Provides a container for your reusable code, which you
can use as a dependency in other app modules or import into other
projects. Structurally, a library module is the same as an app module, but when built,
it creates a code archive file instead of an APK, so it can't be installed on
a device.
In the Create New Module window, Android Studio offers
the following library modules:
Android Library: This type of library can contain all file types supported
in an Android project, including source code, resources, and manifest files.
The build result is an Android Archive (AAR) file that you can add as
a dependency for your Android app modules.
Java Library: This type of library can contain only Java source files.
The build result is an Java Archive (JAR) file that you can add as
a dependency for your Andriod app modules or other Java projects.
Google Cloud module
Provides a container for your Google Cloud backend code. This module
adds the required code and dependencies for a Java App Engine backend
that uses simple HTTP, Cloud Endpoints, and Cloud Messaging to connect
to your app. You can develop your backend to provide cloud services your
app needs.
Using Android Studio to create and develop your Google Cloud module lets
you manage app code and backend code in the same project. You can also run and test
your backend code locally, and use Android Studio to deploy your Google Cloud module.
Some people also refer to modules as sub-projects and that's okay, because
Gradle also refers to modules as projects. For example,
when you create a library module and want to add it as a dependency to your
Android app module, you must declare it as follows:
XML レイアウト、 UI 文字列、bitmap 画像のような、全てのコードでないリソースを含みます。各リソースは対応するサブディレクトリに分けられています。
使用可能な全てのリソースタイプについては、リソースの提供を参照してください。
Project Files
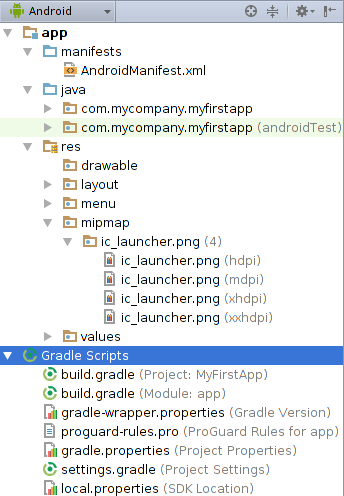
By default, Android Studio displays your project files in the
Android view. This view does not reflect
the actual file hierarchy on disk, but is organized by
modules and file types to simplify navigation between key source files of your project, hiding
certain files or directories that are not commonly used. Some of the structural
changes compared to the structure on disk include the following:
Shows all the project's build-related configuration files in a top-level
Gradle Script group.
Shows all manifest files for each module in a module-level group (when you
have different manifest files for different product flavors and build types).
Shows all alternative resource files in a single group,
instead of in separate folders per resource qualifier. For example, all density
versions of your launcher icon are visible side-by-side.
Within each Android app module, files are shown in the following groups:
Contains the Java source code files, separated by package names,
including JUnit test code.
res
Contains all non-code resources, such as XML layouts, UI strings, and
bitmap images, divided into corresponding sub-directories. For more information
about all possible resource types, see Providing Resources.
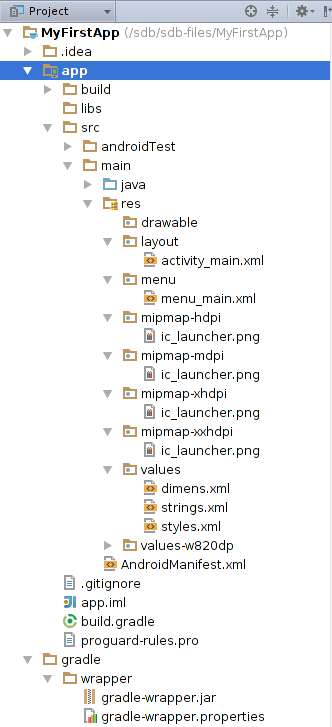
To see the actual
file structure of the project including all files hidden from the
Android view, select Project from the dropdown
at the top of the Project window.
When you select Project view, you can see a lot more files
and directories. The most important of which are the following:
module-name/
build/
Contains build outputs.
libs/
Contains private libraries.
src/
Contains all code and resource files for the module in the following
subdirectories:
androidTest/
Contains code for instrumentation tests that run on an Android device.
For more information, see the
Android Test documentation.
main/
Contains the "main" sourceset files: the Android code and resources
shared by all build variants (files for other build variants
reside in sibling directories, such as src/debug/ for the
debug build type).
AndroidManifest.xml
Describes the nature of the application and each of its components.
For more information, see the
AndroidManifest.xml
documentation.
java/
Contains Java code sources.
jni/
Contains native code using the Java Native Interface (JNI). For more information, see the
Android NDK documentation.
gen/
Contains the Java files generated by Android Studio, such as your R.java file and
interfaces created from AIDL files.
res/
Contains application resources, such as drawable files, layout files,
and UI string. See
Application Resources for more
information.
assets/
Contains file that should be
compiled into an .apk file as-is. You can
navigate this directory in the same way as a typical file system using
URIs and read files as a stream of bytes using the
AssetManager. For example, this is a good location for textures and game
data.
test/
Contains code for local tests that run on your host JVM.
build.gradle (module)
This defines the module-specific build configurations.
build.gradle (project)
This defines your build configuration that apply to all modules.
This file is integral to the project, so you should maintain them
in revision control with all other source code.
To change various settings for your Android Studio project, open the
Project Structure dialog by clicking
File > Project Structure. It contains the
following sections:
SDK Location: Sets the location of the JDK, Android SDK,
and Android NDK that your project uses.
Developer Services: Contains settings for Android Studio
add-in components from Google or other third parties. See
Developer Services, below.
Modules: Allows you to edit module-specific build
configurations, including the target and minimum SDK, the app signature,
and library dependencies.
See Modules, below.
The Developer Services section of the Project Structure
dialog box contains configuration pages
for several services that you can be use with your app. This section
contains the following pages:
AdMob: Allows you to turn on Google's AdMob
component, which helps you understand your users and show them tailored
advertisements.
Analytics: Allows you to turn on Google
Analytics, which helps you measure user interactions with your app
across various devices and environments.
Authentication: Allows users to use Google Sign-In to sign in to your app with their Google
accounts.
Cloud: Allows you to turn on Firebase cloud-based
services for your app.
Notifications: Allows you to use Google Cloud Messaging to communicate between your app
and your server.
Turning on any of these services may cause Android Studio to add necessary
dependencies and permissions to your app. Each configuration page lists these
and other actions that Android Studio takes if you enable the associated service.
The Modules settings section lets you change configuration
options for each of your project's modules.
Each module's settings page is divided into the following tabs:
Properties: Specifies the versions of the SDK and build
tools to use to compile the module.
Signing: Specifies the certificate to use to
sign your
APK.
Flavors: Lets you create multiple build flavors, where
each flavor specifies a set of configuration settings, such as the
module's minimum and target SDK version, and the
version code and
version name. For example, you might define one flavor that has a
minimum SDK of 15 and a target SDK of 21, and another flavor that has a
minimum SDK of 19 and a target SDK of 23.
Build Types: Lets you create and modify build
configurations, as described in Configuring Gradle
Builds. By default, every module has debug and
release build types, but you can define more as needed.
Dependencies: Lists the library, file, and module
dependencies for this module. You can add, modify, and delete dependencies
from this pane. For more information about module dependencies, see
Configuring Gradle
Builds.