
サイト内検索
Using Android Studio 2.2 or higher with the Android Plugin for Gradle version 2.2.0 or higher, you can add C and C++ code to your app by compiling it into a native library that Gradle can package with your APK. Your Java code can then call functions in your native library through the Java Native Interface (JNI). If you want to learn more about using the JNI framework, read JNI tips for Android.
Android Studio's default build tool for native libraries is CMake. Android Studio also supports ndk-build due to the large number of existing projects that use the build toolkit to compile their native code. If you want to import an existing ndk-build library into your Android Studio project, see the section about how to configure Gradle to link to your native library. However, if you are creating a new native library, you should use CMake.
This page gives you the information you need to set up Android Studio with the necessary build tools, create or configure a project to support native code on Android, and build and run your app.
Note: If your existing project uses the deprecated
ndkCompile tool, you should open your
build.properties file and remove the following line of code
before you link Gradle to your native library:
// Remove this line
android.useDeprecatedNdk = true
Attention experimental Gradle users: Consider migrating to plugin version 2.2.0 or higher, and using CMake or ndk-build to build your native libraries if any of the following apply to you: Your native project already uses CMake or ndk-build; you would rather use a stable version of the Gradle build system; or you want support for add-on tools, such as CCache. Otherwise, you can continue to use the experimental version of Gradle and the Android plugin.
To compile and debug native code for your app, you need the following components:
You can install these components using the SDK Manager:
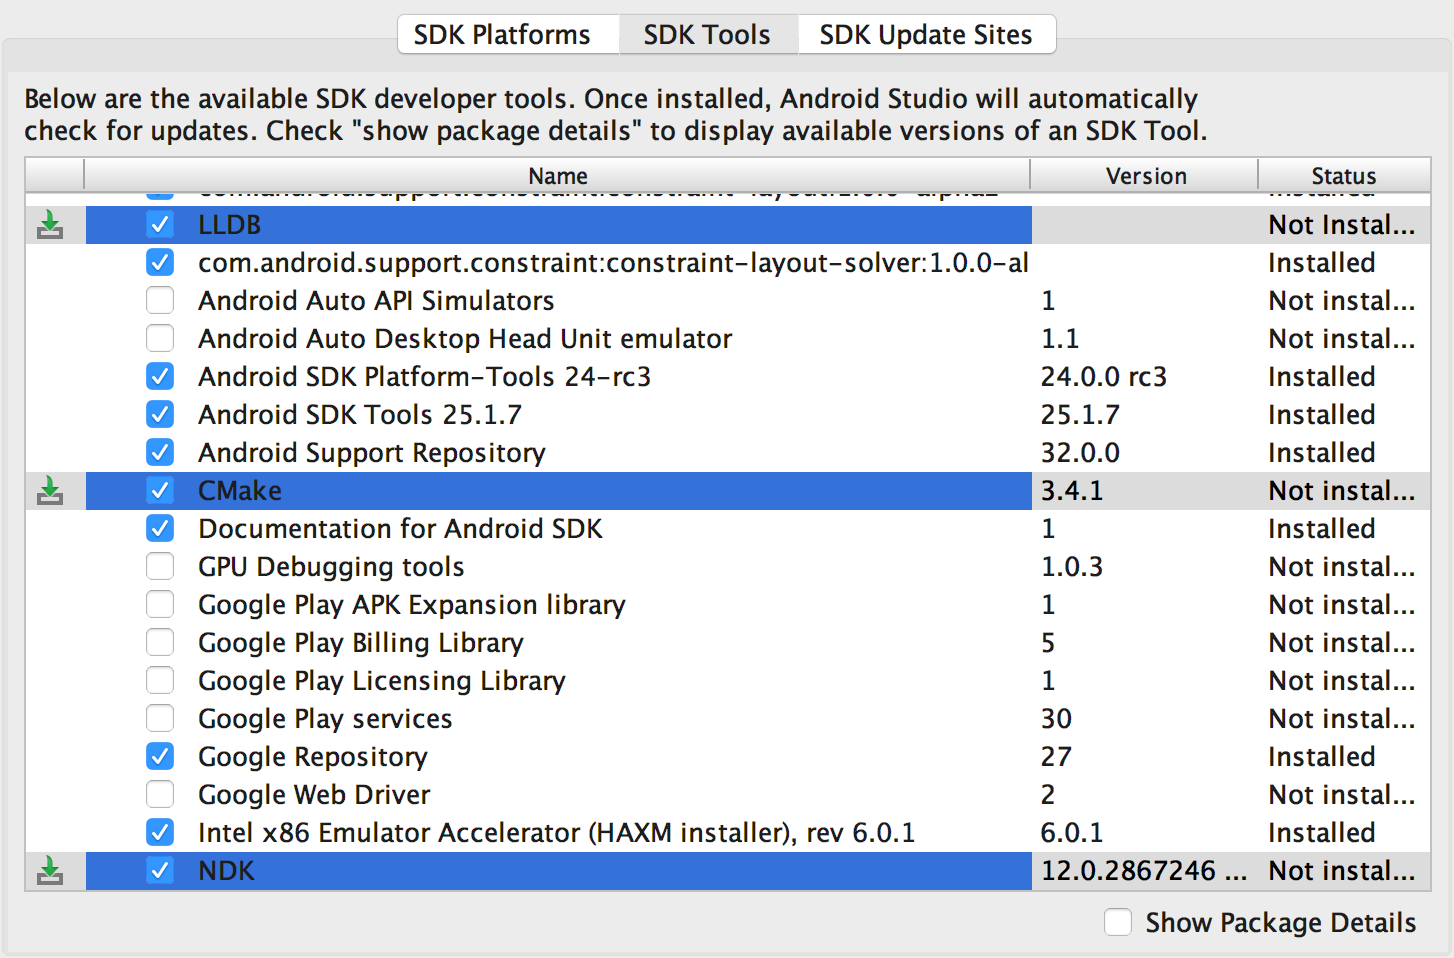
Figure 1. Installing LLDB, CMake, and the NDK from the SDK Manager.
Creating a new project with support for native code is similar to creating any other Android Studio project, but there are a few additional steps:
-fexceptions flag to cppFlags in your module-level
build.gradle file, which Gradle passes to CMake.
-frtti flag to cppFlags in your module-level
build.gradle file, which Gradle passes to CMake.
After Android Studio finishes creating your new project, open the Project pane from the left side of the IDE and select the Android view. As shown in figure 2, Android Studio adds the cpp and External Build Files groups:

Figure 2. Android view groups for your native sources and external build scripts.
Note: This view does not reflect the actual file hierarchy on disk, but groups similar files to simplify navigating your project.
native-lib.cpp, and places it in the src/main/cpp/
directory of your app module. This sample code provides a simple C++
function, stringFromJNI(), that returns the string “Hello from
C++”. You can learn how to add additional source files to your project in
the section about how to Create new native source
files.
build.gradle files tell Gradle how to build your app, CMake and
ndk-build require a build script to know how to build your native library.
For new projects, Android Studio creates a CMake build script,
CMakeLists.txt, and places it in your module’s root directory.
You can learn more about the contents of this build script in the section
about how to Create a Cmake Build Script.
When you click Run  , Android Studio
builds and launches an app that displays the text “Hello from C++” on your
Android device or emulator. The following overview describes the events that
occur in order to build and run the sample app:
, Android Studio
builds and launches an app that displays the text “Hello from C++” on your
Android device or emulator. The following overview describes the events that
occur in order to build and run the sample app:
CMakeLists.txt.
native-lib.cpp, into a shared object library and names
it libnative-lib.so, which Gradle then packages into the APK.
MainActivity loads the native
library using
System.loadLibrary(). The library’s native function,
stringFromJNI(), is now availableto the app.
MainActivity.onCreate() calls stringFromJNI(),
which returns “Hello from C++”, and uses it to update the TextView.
Note: Instant Run is not compatible with projects that use native code. Android Studio automatically disables the feature.
If you want to verify that Gradle packages the native library in the APK, you can use the APK Analyzer:
app/build/outputs/apk/ directory and
click OK.
libnative-lib.so in the
APK Analyzer window under lib/<ABI>/.
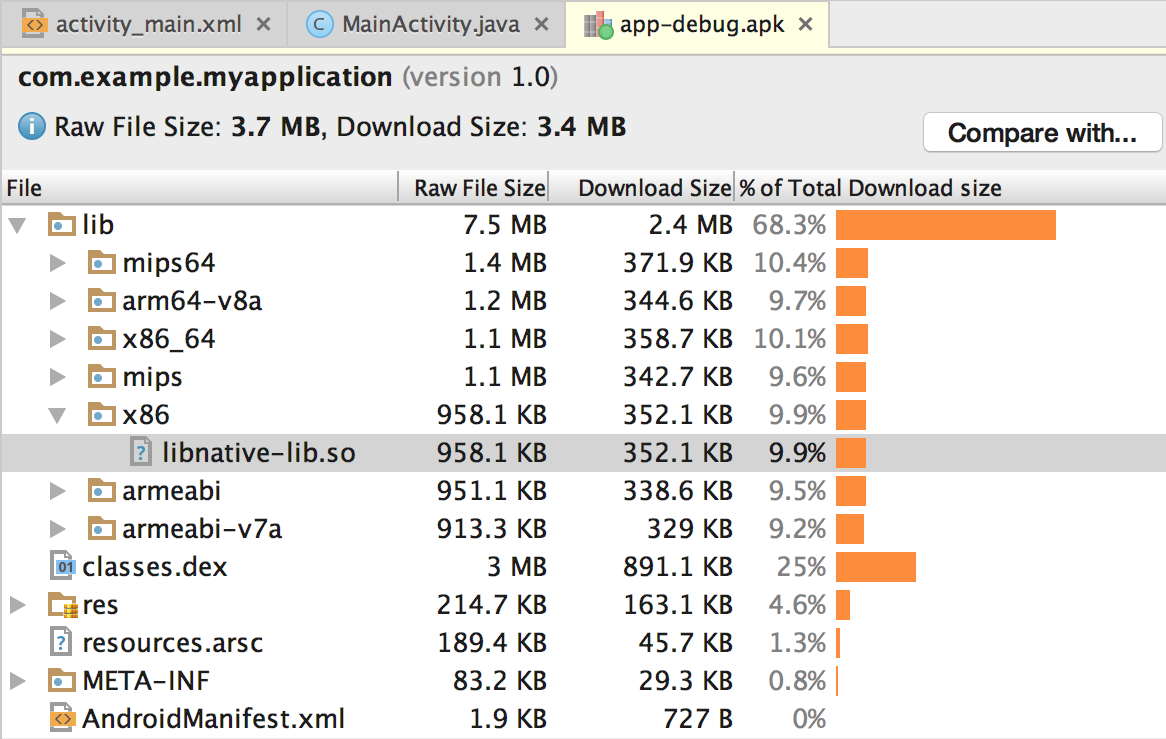
Figure 3. Locating a native library using the APK Analyzer.
Tip: If you want to experiment with other Android apps that use native code, click File > New > Import Sample and select a sample project from the Ndk list.
If you want to add native code to an existing project, perform these steps:
CMakeLists.txt build script, or uses ndk-build and includes
an Android.mk
build script, you can skip this step.
Once you configure your project, you can access your native functions from
Java code using the JNI framework. To build and run your app, simply
click Run  . Gradle adds your
external native build process as a dependency to compile, build, and package
your native library with your APK.
. Gradle adds your
external native build process as a dependency to compile, build, and package
your native library with your APK.
To create a cpp/ directory with new native source files in the
main sourceset of your app module, proceed as follows:
cpp) and click
OK.
native-lib.
.cpp.
.cxx or .hxx, by clicking Edit File Types
 . In the C/C++ dialog box that pops up,
select another file extension from the Source Extension and
Header Extension drop-down menus and click
OK.
. In the C/C++ dialog box that pops up,
select another file extension from the Source Extension and
Header Extension drop-down menus and click
OK.
If your native sources don’t already have a CMake build script, you need to
create one yourself and include the appropriate CMake commands. A CMake build
script is a plain text file that you must name CMakeLists.txt.
This section covers some basic commands you should include in your build
script in order to tell CMake which sources to use when creating your native
library.
Note: If your project uses ndk-build, you don’t need to
create a CMake build script. You can link Gradle to
your native library by providing a path to your Android.mk file.
To create a plain text file that you can use as your CMake build script, proceed as follows:
Note: You can create the build script in any location you want. However, when configuring the build script, paths to your native source files and libraries are relative to the location of the build script.
You can now configure your build script by adding CMake commands. To instruct
CMake to create a native library from native source code, add the cmake_minimum_required() and add_library() commands to your build script:
# Sets the minimum version of CMake required to build your native library.
# This ensures that a certain set of CMake features is available to
# your build.

cmake_minimum_required(VERSION 3.4.1)

# Specifies a library name, specifies whether the library is STATIC or
# SHARED, and provides relative paths to the source code. You can
# define multiple libraries by adding multiple add.library() commands,
# and CMake builds them for you. When you build your app, Gradle
# automatically packages shared libraries with your APK.

add_library( # Specifies the name of the library.
             native-lib

             # Sets the library as a shared library.
             SHARED

             # Provides a relative path to your source file(s).
             src/main/cpp/native-lib.cpp )
When you add a source file or library to your CMake build script using
add_library(), Android Studio also shows associated header files
in the Project view after you sync your project. However, in
order for CMake to locate your header files during compile time, you need to
add the include_directories() command to your CMake
build script and specify the path to your headers:
add_library(...)

# Specifies a path to native header files.
include_directories(src/main/cpp/include/)
The convention CMake uses to name the file of your library is as follows:
liblibrary-name.so
For example, if you specify "native-lib" as the name of your shared library
in the build script, CMake creates a file named
libnative-lib.so. However, when loading this library in your
Java code, use the name you specified in the CMake build script:
static {
    System.loadLibrary(“native-lib”);
}
Note: If you rename or remove a library in your CMake build script, you need to clean your project before Gradle applies the changes or removes the older version of the library from your APK. To clean your project, select Build > Clean Project from the menu bar.
Android Studio automatically adds the source files and headers to the
cpp group in the Project pane. By using
multiple add_library() commands, you can define additional
libraries for CMake to build from other source files.
The Android NDK provides a set of native APIs and libraries that you may find
useful. You can use any of these APIs by including the NDK libraries in your project’s
CMakeLists.txt script file.
Prebuilt NDK libraries already exist on the Android platform, so you don’t need to build them or package them into your APK. Because the NDK libraries are already a part of CMake’s search path, you don’t even need to specify the location of the library in your local NDK installation—you only need to provide CMake with the name of the library you want to use and link it against your own native library.
Add the find_library() command to your CMake build
script to locate an NDK library and store its path as a variable. You use
this variable to refer to the NDK library in other parts of the build script.
The following sample locates the Android-specific log support library
and stores its path in log-lib:
find_library( # Defines the name of the path variable that stores the
              # location of the NDK library.
              log-lib

              # Specifies the name of the NDK library that
              # CMake needs to locate.
              log )
In order for your native library to call functions in the log
library, you need to link the libraries using the target_link_libraries() command in
your CMake build script:
find_library(...)

# Links your native library against one or more other native libraries.
target_link_libraries( # Specifies the target library.
                       native-lib

                       # Links the log library to the target library.
                       ${log-lib} )
The NDK also includes some libraries as source code that you need to build
and link to your native library. You can compile the source code into a
native library by using the add_library() command in your CMake build script.
To provide a path to your local NDK library, you can use the
ANDROID_NDK path variable, which Android Studio automatically
defines for you.
The following command tells CMake to build
android_native_app_glue.c, which manages NativeActivity
lifecycle events and touch input, into a static library and links it to
native-lib:
add_library( app-glue
             STATIC
             ${ANDROID_NDK}/sources/android/native_app_glue/android_native_app_glue.c )

# You need to link static libraries against your shared native library.
target_link_libraries( native-lib app-glue ${log-lib} )
Adding a prebuilt library is similar to specifying another native library for
CMake to build. However, because the library is already built, you need to
use the IMPORTED flag to tell CMake that you
only want to import the library into your project:
add_library( imported-lib
             SHARED
             IMPORTED )
You then need to specify the path to the library using the
set_target_properties() command as
shown below.
Some libraries provide separate packages for specific CPU architectures, or
Application Binary Interfaces (ABI), and
organize them into separate directories. This approach helps libraries take
advantage of certain CPU architectures while allowing you to use only the
versions of the library you want. To add multiple ABI versions of a library
to your CMake build script, without having to write multiple commands for
each version of the library, you can use the ANDROID_ABI path
variable. This variable uses a list of the default ABIs that the NDK supports, or a filtered list
of ABIs you manually configure Gradle to
use. For example:
add_library(...)
set_target_properties( # Specifies the target library.
                       imported-lib

                       # Specifies the parameter you want to define.
                       PROPERTIES IMPORTED_LOCATION

                       # Provides the path to the library you want to import.
                       imported-lib/src/${ANDROID_ABI}/libimported-lib.so )
For CMake to locate your header files during compile time, you need to use
the include_directories() command and include the path to your
header files:
include_directories( imported-lib/include/ )
Note: If you want to package a prebuilt library that is not
a build-time dependency—for example, when adding a prebuilt library that is a
dependency of imported-lib, you do not need perform the
following instructions to link the library.
To link the prebuilt library to your own native library, add it to the
target_link_libraries() command in your CMake build script:
target_link_libraries( native-lib imported-lib app-glue ${log-lib} )
When you build your app, Gradle automatically packages the imported library into the APK. You can verify which libraries Gradle packages into your APK by using the APK Analyzer. For more information about CMake commands, see the CMake documentation."
To link Gradle to your native library, you need to provide a path to your CMake or ndk-build script file. When you build your app, Gradle runs CMake or ndk-build as a dependency, and packages shared libraries with your APK. Gradle also uses the build script to know which files to pull into your Android Studio project, so you can access them from the Project window. If you don’t have a build script for your native sources, you need to create a CMake build script before you proceed.
Once you link Gradle to a native project, Android Studio updates the Project pane to show your source files and native libraries in the cpp group, and your external build scripts in the External Build Files group.
Note: When making changes to the Gradle configuration, make sure to
apply your changes by clicking Sync Project  in the toolbar.
Additionally, when making changes to your CMake or ndk-build script file
after you have already linked it to Gradle, you should sync Android Studio
with your changes by selecting Build > Refresh Linked C++ Projects
from the menu bar.
in the toolbar.
Additionally, when making changes to your CMake or ndk-build script file
after you have already linked it to Gradle, you should sync Android Studio
with your changes by selecting Build > Refresh Linked C++ Projects
from the menu bar.
You can link Gradle to an external CMake or ndk-build project using the Android Studio UI:
CMakeLists.txt script
file for your external CMake project.
Android.mk script file for
your external ndk-build project. Android Studio also includes the
Application.mk
file if it is located in the same directory as your
Android.mk file.

Figure 4. Linking an external C++ project using the Android Studio dialog.
To manually configure Gradle to link to your native library, you need to add
the externalNativeBuild {} block to your module-level
build.gradle file and configure it with either cmake
{} or ndkBuild {}:
android {
  ...
  defaultConfig {...}
  buildTypes {...}

  // Encapsulates your external native build configurations.
  externalNativeBuild {

    // Encapsulates your CMake build configurations.
    cmake {

      // Provides a relative path to your CMake build script.
      path "CMakeLists.txt"
    }
  }
}
Note: If you want to link Gradle to an existing ndk-build
project, use the ndkBuild {} block instead of cmake
{}, and provide a relative path to your Android.mk file. Gradle also
includes the Application.mk file if it
is located in the same directory as your Android.mk file.
You can specify optional arguments and flags for CMake or ndk-build by
configuring another externalNativeBuild {} block within the
defaultConfig {} block of your module-level
build.gradle file. Similar to other properties in the
defaultConfig {} block, you can override these properties
for each product flavor in your build configuration.
For example, if your CMake or ndk-build project defines multiple native
libraries, you can use the targets property to build and package
only a subset of those libraries for a given product flavor. The following
code sample describes some of the properties you can configure:
android {
  ...
  defaultConfig {
    ...
    // This block is different from the one you use to link Gradle
    // to your CMake or ndk-build script.
    externalNativeBuild {

      // For ndk-build, instead use ndkBuild {}
      cmake {

        // Passes optional arguments to CMake.
        arguments "-DANDROID_ARM_NEON=TRUE", "-DANDROID_TOOLCHAIN=clang"

        // Sets optional flags for the C compiler.
        cFlags "-D_EXAMPLE_C_FLAG1", "-D_EXAMPLE_C_FLAG2"

        // Sets a flag to enable format macro constants for the C++ compiler.
        cppFlags "-D__STDC_FORMAT_MACROS"
      }
    }
  }

  buildTypes {...}

  productFlavors {
    ...
    demo {
      ...
      externalNativeBuild {
        cmake {
          ...
          // Specifies which native libraries to build and package for this
          // product flavor. If you don't configure this property, Gradle
          // builds and packages all shared object libraries that you define
          // in your CMake or ndk-build project.
          targets "native-lib-demo"
        }
      }
    }

    paid {
      ...
      externalNativeBuild {
        cmake {
          ...
          targets "native-lib-paid"
        }
      }
    }
  }

  // Use this block to link Gradle to your CMake or ndk-build script.
  externalNativeBuild {
    cmake {...}
    // or ndkBuild {...}
  }
}
To learn more about configuring product flavors and build variants, go to
Configure Build Variants. For
a list of variables you can configure for CMake with the
arguments property, see Using CMake Variables.
By default, Gradle builds your native library into separate .so
files for the ABIs the NDK supports
and packages them all into your APK. If you want Gradle to build and package
only certain ABI configurations of your native libraries, you can specify
them with the ndk.abiFilters flag in your module-level
build.gradle file, as shown below:
android {
  ...
  defaultConfig {
    ...
    externalNativeBuild {
      cmake {...}
      // or ndkBuild {...}
    }

    ndk {
      // Specifies the ABI configurations of your native
      // libraries Gradle should build and package with your APK.
      abiFilters 'x86', 'x86_64', 'armeabi', 'armeabi-v7a',
                   'arm64-v8a'
    }
  }
  buildTypes {...}
  externalNativeBuild {...}
}
In most cases, you only need to specify abiFilters in the
ndk {} block, as shown above, because it tells Gradle to both
build and package those versions of your native libraries. However, if you
want to control what Gradle should build, independently of what you want it
to package into your APK, configure another abiFilters flag in
the defaultConfig.externalNativeBuild.cmake {} block (or
defaultConfig.externalNativeBuild.ndkBuild {} block). Gradle
builds those ABI configurations but only packages the ones you specify in the
defaultConfig.ndk{} block.
To further reduce the size of your APK, consider configuring ABI
APK splits—instead of creating one large APK with the all versions of
your native libraries, Gradle creates a separate APK for each ABI you want to
support and only packages the files each ABI needs. If you configure an ABI
split without specifying the abiFilters flag as shown in the
code sample above, Gradle builds all supported ABI versions of your native
libraries, but only packages those you specify in your ABI split
configuration. To avoid building versions of your native libraries that you
don't want, provide the same list of ABIs for both the
abiFilters flag and your ABI split configuration.