
サイト内検索
The Android Emulator simulates a device and displays it on your development computer. It lets you prototype, develop, and test Android apps without using a hardware device. The emulator supports Android phone, tablet, Android Wear, and Android TV devices. It comes with predefined device types so you can get started quickly, and you can create your own device definitions and emulator skins.
The Android Emulator is fast, powerful, and feature-rich. It can transfer information faster than using a connected hardware device, speeding up the development process. The multi-core feature lets the emulator take advantage of multiple core processors on your development computer to improve emulator performance even more.
You can launch an app on the emulator when you run your project, or you can drag an APK file onto the emulator to install it. As with a hardware device, after you install an app on a virtual device, it remains until you uninstall or replace it. If needed, you can test how multiple apps, such as your own or system apps, work with each other.
You interact with the emulator just as you would with a hardware device, but using your mouse and keyboard, and emulator buttons and controls. The emulator supports virtual hardware buttons and touchscreens, including two-finger operations, as well as directional pads (D-pads), trackballs, wheels, and various sensors. You can dynamically resize the emulator window as needed, zoom in and out, change the orientation, and even take a screenshot.
When your app is running on the emulator, it can use the services of the Android platform to invoke other apps, access the network, play audio and video, accept audio input, store and retrieve data, notify the user, and render graphical transitions and themes. The emulator has controls that let you easily send incoming phone calls and text messages, specify the location of the device, simulate fingerprint scans, specify network speed and status, and simulate battery properties. The emulator can simulate an SD card and internal data storage; you can drag a file, such as a graphics or data file, onto the emulator to store it.
Watch the following video for a fast-paced visual overview of some emulator features.
The emulator uses an Android Virtual Device (AVD) configuration to determine the look, functionality, and system image of the simulated device. AVDs let you define certain hardware aspects of your emulated devices and allow you to create many configurations to test different Android platforms and hardware permutations.
Each AVD functions as an independent device, with its own private storage for user data, SD card, and so on. When you launch the emulator with an AVD configuration, it automatically loads the user data and SD card data from the AVD directory. By default, the emulator stores the user data, SD card data, and cache in the AVD directory.
To create and manage AVDs, use the AVD Manager.
The Android Emulator runs a full Android system stack, down to the kernel level, that includes a set of preinstalled apps (such as the dialer) that you can access from your apps. You can choose which version of the Android system you want to run in the emulator when creating AVDs.
The Android system images available through the AVD Manager contain code for the Android Linux kernel, the native libraries, the VM, and the various Android packages (such as the Android framework and preinstalled apps).
The version of Android Emulator described in this page requires the following:
The Android Emulator supports most features of a device, but doesn't include virtual hardware for:
The watch emulator for Android Wear doesn't support the Overview (Recent Apps) button, D-pad, and fingerprint sensor.
While most end users of phones and tablets tend to use earlier API levels, Android Wear and Android TV users tend to use the latest releases. Using recent releases can give you a better experience using the emulator.
You can run an app from an Android Studio project. Or, you can run an app that's been installed on the emulator as you would run any app on a device.
To start the emulator and run an app in your project:
 .
.
The Select Deployment Target dialog appears.
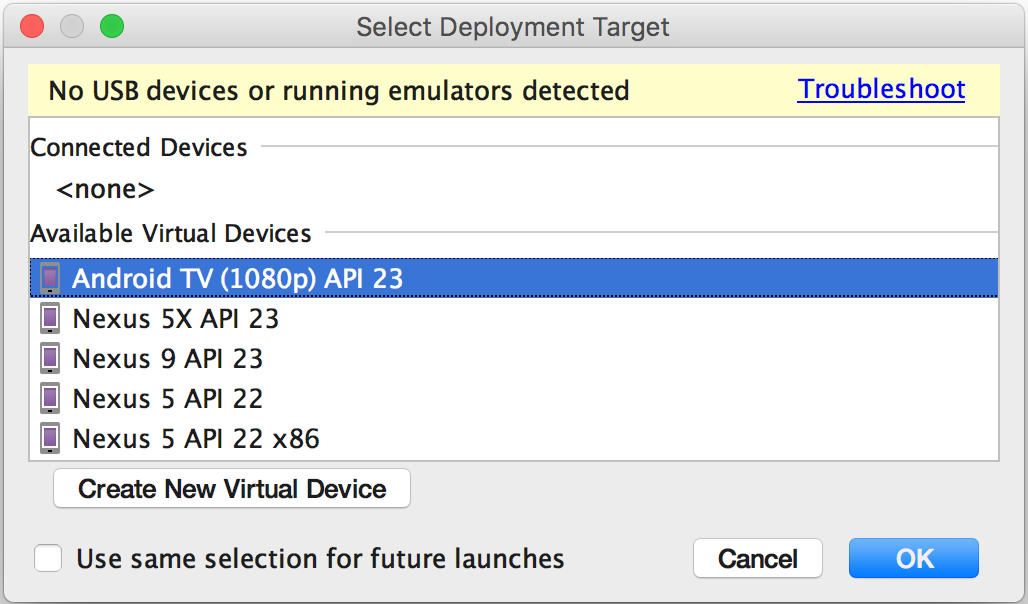
The No USB devices or running emulators detected warning means that you don’t currently have any emulators running, or any detected hardware devices connected to your computer. If you don’t have hardware devices connected to your computer, or any emulators running, you can ignore it.
Some errors you must fix before you can continue, such as certain Hardware Accelerated Execution Manager (Intel® HAXM) errors.
If you don’t see a definition you want to use, click Create New Virtual Device to launch the AVD Manager. After you define a new AVD, in the Select Deployment Target dialog, click OK.
If you want to use this emulator definition as the default for your project, select Use same selection for future launches.
The emulator launches and displays your app.
You can use the features described in the following sections:
 .
.The emulator device stores the installed app so you can run it again, if needed. You need to uninstall an app to remove it. If you run the project again on the same emulator, it replaces the app with the new version.
To start the emulator:
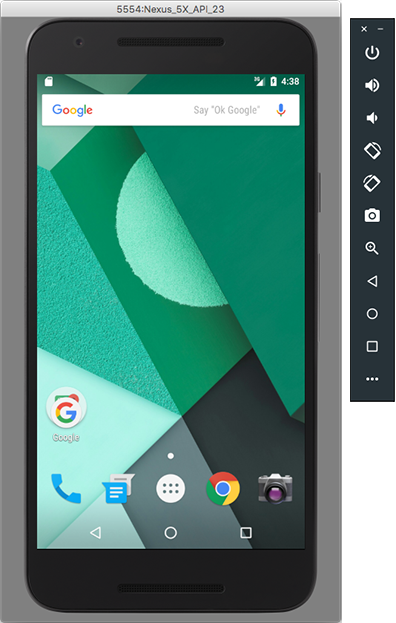
.The Android Emulator appears.
While the emulator is running, you can run Android Studio projects and choose the emulator as the target device. You can also drag one or more APKs onto the emulator to install them, and then run them.
Use your computer mouse pointer to mimic your finger on the touchscreen; select menu items and input fields; and click buttons and controls. Use your computer keyboard to type characters and enter emulator shortcuts.
| Feature | Description |
|---|---|
| Swipe the screen | Point to the screen, press and hold the primary mouse button, swipe across the screen, and then release. |
| Drag an item | Point to an item on the screen, press and hold the primary mouse button, move the item, and then release. |
| Tap (touch) |
Point to the screen, press the primary mouse button, and then release. For example, you could click a text field to start typing in it, select an app, or press a button. |
| Double tap | Point to the screen, press the primary mouse button quickly twice, and then release. |
| Touch and hold | Point to an item on the screen, press the primary mouse button, hold, and then release. For example, you could open options for an item. |
| Type | You can type in the emulator by using your computer keyboard, or using a keyboard that pops up on the emulator screen. For example, you could type in a text field after you selected it. |
Pressing Ctrl or Command (⌘) brings up a pinch gesture multi-touch
interface. The mouse acts as the first finger, and across the anchor point
is the second finger. Drag the cursor to move the first point.
Clicking the left mouse button acts like touching down both points, and
releasing acts like picking both up. |
|
| Vertical swipe | Open a vertical menu on the screen and use the scroll wheel (also called the mouse wheel) to scroll through the menu items until you see the one you want. Click the menu item to select it. |
The panel on the right side of the emulator lets you perform various tasks. You can also drag files onto the emulator to install apps and download files.
| Feature | Description | Keyboard Shortcut |
|---|---|---|
| Close |
Close the emulator. | |
Minimize |
Minimize the emulator window. | |
| Resize | Resize the emulator as you would any other operating system window. The emulator maintains an aspect ratio appropriate for your device. | ⌘↑ and ⌘↓ |
Power |
Click to turn the screen on or off. Click and hold to turn the device on or off. |
Ctrl+P ⌘P |
Volume Up |
Click to view a slider control and turn the volume up. Click again to turn it up more, or use the slider control to change the volume. | Ctrl+= ⌘= |
Volume Down |
Click to view a slider control and turn the volume down. Click again to turn it down more, or use the slider control to change the volume. | Ctrl+- ⌘- |
Rotate Left |
Rotate the phone 90 degrees counterclockwise. | Ctrl+Left ⌘← |
Rotate Right |
Rotate the phone 90 degrees clockwise. | Ctrl+Right ⌘→ |
Take Screenshot
|
Click to take a screenshot of the device. The default save location is
your computer desktop. To change the save location, select
… > Settings. The emulator creates a
file with the name Screenshot_yyyymmdd-hhmmss.png
using the year, month, day, hour, minute, and second of the capture, for
example, Screenshot_20160219-145848.png. |
Ctrl+S ⌘S |

|
Click so the cursor changes to the zoom icon:
Click Enter Zoom Mode again to return to normal screen size. |
Ctrl+Z ⌘Z
While in zoom mode:
Ctrl+Up Ctrl+Down
Ctrl+Shift+Up Ctrl+Shift+Down
Ctrl+Shift+Left Ctrl+Shift+Right
⌘↑ and ⌘↓
⌘⇧↑ and ⌘⇧↓
⌘⇧← and ⌘⇧→ |
Back |
Return to the previous screen, or close a dialog box, an options menu, the Notifications panel, or the onscreen keyboard. | Ctrl+Backspace
⌘⌫ |
Home |
Return to the Home screen. Press and hold to open the item specific to your API level. | Ctrl+H ⌘⇧H |
Overview
 (Recent Apps) |
Tap to open a list of thumbnail images of apps you’ve worked with recently. To open an app, tap it. To remove a thumbnail from the list, swipe it left or right. This button isn't supported for Android Wear. | Ctrl+O ⌘O |
| Menu | Type the keyboard shortcut to simulate the Menu button, for example, to open the menu for the selected app. | Ctrl+M ⌘M |
More |
Click to access other features and settings, described in the next table. | |
| Install an APK | Drag an APK file onto the emulator screen. An APK Installer dialog appears. When the installation completes, you can view the app in your apps list.The app didn’t install if a dialog appears that says “APK failed to install.” | |
| Add a file | Drag any file onto the emulator screen. It’s placed in the
/sdcard/Download directory. Navigate to the file using the
method for the API level. For example, for API 22, this is the navigation
path: Settings > Device: Storage & USB
> Internal Storage > Explore
(Virtual SD Card). |
|
| Toggle trackball mode | F6 |
The extended controls let you send data, change device properties, control apps, and more. To access the controls, select … in the emulator panel and then select the option you want in the left panel of the Extended Controls dialog.
| Feature | Description | Keyboard Shortcuts |
|---|---|---|
| Location |
The emulator lets you simulate “my location” information: the location where
the emulated device is currently located. For example, if you click My Location
To send a GPS location:
In decimal mode, enter a Latitude value in the range -90.0 to +90.0 degrees and a Longitude value in the range -180.0 to +180.0 degrees. In sexigesimal mode, enter a three-part Latitude value in the range -90 to +90 degrees, 0 to 59 minutes, and 0.0 to 60.0 seconds. Enter a Longitude value in the range -180 to +180 degrees, 0 to 59 minutes, and 0.0 to 60.0 seconds. For the latitude, - indicates south and + indicates north; for the longitude, - indicates west and + indicates east. The + is optional. Optionally specify an Altitude value in the range -1,000.0 to +10,000.0 meters. To use geographic data from a GPS exchange format (GPX) or Keyhole Markup Language (KML) file:
The speed defaults to the Delay value (Speed 1X). You can increase the speed by double (Speed 2X), triple (Speed 3X), and so on. |
Ctrl+Shift+L ⌘⇧L |
| Cellular | The emulator lets you simulate various network conditions. You can approximate the network speed for different network protocols, or you can specify Full, which transfers data as quickly as your computer allows. Specifying a network protocol is always slower than Full. You can also specify the voice and data network status, such as roaming. The defaults are set in the AVD. Select a Network type:
Select a Signal strength:
Select a Voice status, Data status, or both:
|
Ctrl+Shift+C ⌘⇧C |
| Battery | You can simulate the battery properties of a device to see how your app performs under different conditions. To select a Charge level, use the slider control. Select a Charger connection value:
Select a Battery health value:
Select a Battery status value:
|
Ctrl+Shift+B ⌘⇧B |
| Phone | The emulator lets you simulate incoming phone calls and text messages. Note that the information flow is one way, from the control to the emulator. For example, the control doesn’t change its state if the emulator hangs up; you need to end the call in the control. To initiate a call to the emulator:
To send a text message to the emulator:
|
Ctrl+Shift+P ⌘⇧P |
| Directional Pad | If the AVD has the directional pad enabled in the hardware profile, you can use the directional pad controls with the emulator. However, not all devices can support the directional pad; for example, an Android watch. The buttons simulate the following actions: 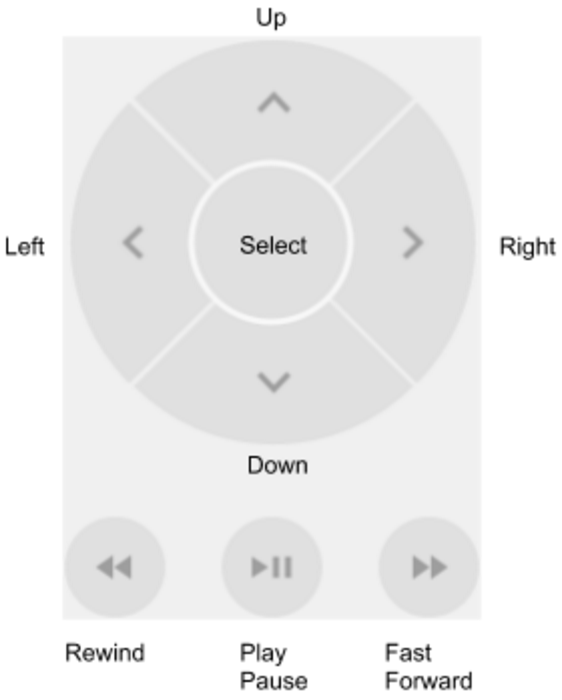
|
Ctrl+Shift+D ⌘⇧D |
| Fingerprint | This control can simulate 10 different fingerprint scans. You can use it to test fingerprint integration in your app. This feature is disabled for Android 5.1 (API level 22) and lower, and for Android Wear. To simulate a fingerprint scan on the virtual device:
|
Ctrl+Shift+F ⌘⇧F |
| Virtual sensors > Accelerometer |
This control lets you test your app against changes in device position, orientation, or both. For example, you can simulate gestures such as tilt and rotation. The accelerometer doesn't track the absolute position of the device: it just detects when a change is occurring. The control simulates the way accelerometer and magnetometer sensors would respond when you move or rotate a real device. The control reports
The control also reports
To rotate the device around the x, y, and z axes, select Rotate and do one of the following:
See Computing the Device's Orientation for more information about how yaw, pitch, and roll are calculated. To move the device horizontally (x) or vertically (y), select Move and do one of the following:
To position the device at 0, 90, 180, or 270 degrees:
As you adjust the device, the Resulting Values fields change accordingly. These are the values that an app can access. For more information about these sensors, see Sensors Overview, Motion Sensors, and Position Sensors. You can import the AccelerometerPlay app to try out the Accelerometer control. Select File > New > Import Sample and select the app in the dialog. This app is showcased in the emulator video on this page. |
Ctrl+Shift+V ⌘⇧V |
| Virtual sensors > Additional sensors | The emulator can simulate various position and environment sensors. It lets you adjust the following sensors so you can test them with your app:
For more information about these sensors, see Sensors Overview, Position Sensors, and Environment Sensors. |
Ctrl+Shift+V ⌘⇧V |
| Settings | You can specify the following settings:
|
Ctrl+Shift+S ⌘⇧S |
| Help > Keyboard Shortcuts | See the keyboard shortcuts that the emulator accepts. For the shortcuts to work, you need to:
|
F1 ⌘/ |
| Help > Emulator Help | To go to the online documentation for the emulator, click Documentation. To file a bug against the emulator, click File a Bug. To make suggestions, click Send Feedback. All of these links require an internet connection and a browser. |
F1 ⌘/ |
| Help > About | See which adb port the emulator uses, as well as the Android and emulator version numbers. Compare the latest available emulator version with your version to determine if you have the latest software installed. The emulator serial number is emulator-adb_port, which you can specify as an adb command line option, for example. |
F1 ⌘/ |
 in Google Maps and then send a location, the map shows it.