
サイト内検索
By default, Android Studio sets up new projects to deploy to the Emulator or a physical device with just a few clicks. With Instant Run, you can push changes to methods and existing app resources to a running app without building a new APK, so code changes are visible almost instantly.
To build and run your app, click Run  .
Android Studio builds your app with
Gradle, asks you to select a deployment target (an emulator or a connected
device), and then deploys your app to it. You can customize some of this
default behavior, such as selecting an automatic deployment target, by
changing the run configuration.
.
Android Studio builds your app with
Gradle, asks you to select a deployment target (an emulator or a connected
device), and then deploys your app to it. You can customize some of this
default behavior, such as selecting an automatic deployment target, by
changing the run configuration.
If you want to use the Android Emulator to run your app, you need to have an Android Virtual Device (AVD) ready. If you haven't already created one, then after you click Run, click Create New Emulator in the Select Deployment Target dialog. Follow the Virtual Device Configuration wizard to define the type of device you want to emulate. For more information, see Create and Manage Virtual Devices.
If you're using a physical Android device, you need to enable USB debugging on the device. For more information, see Run Apps on a Hardware Device.
Note: You can also deploy your app in debug mode by clicking
Debug  .
Running your app in debug mode
allows you to set breakpoints in your code, examine variables and evaluate
expressions at run time, and run debugging tools. To learn more, see
Debug Your App.
.
Running your app in debug mode
allows you to set breakpoints in your code, examine variables and evaluate
expressions at run time, and run debugging tools. To learn more, see
Debug Your App.
If your project has multiple modules beyond the default app module, you can build a specific module as follows:
Android Studio builds the module using Gradle. Once the module is built, you can run and debug it if you've built a module for a new app or new device, or use it as a dependency if you've built a library or Google Cloud module.
To run a built app module:
The run/debug configuration specifies the module to run, package to deploy, activity to start, target device, emulator settings, logcat options, and more. The default run/debug configuration launches the default project activity and uses the Select Deployment Target dialog for target device selection. If the default settings don't suit your project or module, you can customize the run/debug configuration, or even create a new one, at the project, default, and module levels. To edit a run/debug configuration, select Run > Edit Configurations. For more information, see Create and Edit Run/Debug Configurations.
By default, Android Studio builds the debug version of your app, which is intended only for testing, when you click Run. You need to build the release version to prepare your app for public release.
To change the build variant Android Studio uses, select Build
> Select Build Variant in the menu bar (or click
Build Variants  in the windows bar), and then select a build variant from
the drop-down menu. By default, new projects are set up with a debug and
release build variant.
in the windows bar), and then select a build variant from
the drop-down menu. By default, new projects are set up with a debug and
release build variant.
Using product flavors, you can create additional build variants for different versions of your app, each having different features or device requirements. To find out more about build variants and product flavors, see Configure Your Build.
To create an APK for your app, follow these steps:
window.To instead build the APK and immediately run it on a device,
click Run in the toolbar.
All built APKs are saved in
project-name/module-name/build/outputs/apk/.
You can also locate the generated APKs by clicking the link in the
pop-up dialog that appears once the build is complete, as shown in figure 2.

Figure 2. Click the link to locate the generated APK files.
Note: Before you can generate a release version of your app for public distribution, you must sign your APK.
You can view details about the build process by clicking View > Tool
Windows > Gradle Console (or by clicking Gradle Console
 in the tool window bar). The console displays each task that
Gradle executes in order to build your app, as shown in figure 1.
in the tool window bar). The console displays each task that
Gradle executes in order to build your app, as shown in figure 1.
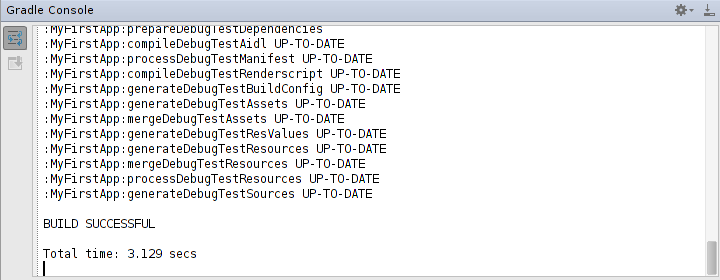
Figure 1. The Gradle Console in Android Studio.
If your build variants use product flavors, Gradle also invokes tasks to
build those product flavors. To view the list of all available build tasks,
click View > Tool Windows > Gradle (or click Gradle
 in the tool window bar).
If an error occurs during the build process, the Messages window
appears to describe the issue. Gradle may recommend some command-line
options to help you resolve the issue, such as --stacktrace or
--debug. To use command-line options with your build process:
Gradle will apply these command-line options the next time you try building your app.
Introduced in Android Studio 2.0, Instant Run is a behavior for the
Run and Debug commands that significantly reduces the
time between updates to your app. Although your first build may take longer
to complete, Instant Run pushes subsequent updates to your app without
building a new APK, so changes are visible much more quickly.
Instant Run is supported only when you deploy the debug build variant, use
Android plugin for Gradle version 2.0.0 or higher, and set
minSdkVersion to 15 or higher in your app's module-level
build.gradle file. For the best performance, set
minSdkVersion to 21 or higher.
After deploying an app, a small, yellow thunderbolt icon appears within the
Run  button (or Debug
 button), indicating that Instant Run is
ready to push updates the next time you click the button. Instead of building
a new APK, it pushes just those new changes and, in some cases, the app
doesn't even need to restart but immediately shows the effect of those code
changes.
button), indicating that Instant Run is
ready to push updates the next time you click the button. Instead of building
a new APK, it pushes just those new changes and, in some cases, the app
doesn't even need to restart but immediately shows the effect of those code
changes.
Instant Run pushes updated code and resources to your connected device or emulator by performing a hot swap, warm swap, or cold swap. It automatically determines the type of swap to perform based on the type of change you made. The video above provides interesting detail about how this all works under the hood. For a quick summary of how Instant Run behaves when you push certain code changes to a target device, however, see the following table.
| Code Change | Instant Run Behavior |
|---|---|
|
Supported with hot swap: This is the fastest type of swap and makes changes visible much more quickly. Your application keeps running and a stub method with the new implementation is used the next time the method is called. Hot swaps do not re-initialize objects in your running app. You may need to restart the current activity, or restart the app, before you see certain updates. By default, Android Studio automatically restarts the current activity after performing a hot swap. If you do not want this behavior, you can disable automatic activity restarts. |
|
Supported with warm swap: This swap is still very fast, but Instant Run must restart the current activity when it pushes the changed resources to your app. Your app keeps running, but a small flicker may appear on the screen as the activity restarts—this is normal. |
Structural code changes, such as:
|
Supported with cold swap (API level 21 or higher): This swap is a bit slower because, although a new APK is not required, Instant Run must restart the whole app when it pushes structural code changes. For target devices running API level 20 or lower, Android Studio deploys a full APK. |
|
When making changes to the app's manifest or resources referenced by the manifest, Android Studio automatically deploys a new build in order to apply these changes. This is because certain information about the app, such as its name, app icon resources, and intent filters, are determined from the manifest when the APK is installed on the device.
If your build process automatically updates any part of the app
manifest, such as automatically iterating When updating an Android system UI element, such as a widget or notification, you need to perform a Clean and Rerun to see your changes. Alternatively, because performing clean builds may take longer while using Instant Run, you can temporarily disable Instant Run while making updates to your widget UI or notification. |
Note: If you need to restart your app after a crash, do not
launch it from your target device. Restarting your app from your target
device does not apply any of your code changes since the last cold swap or
incremental build. To launch your app with all your recent changes,
click Run (or Debug
) from Android Studio.
When pushing code changes that affect certain initializers, such as changes
to an app's onCreate()
method, you need to restart your app for the changes to take effect. To
perform an incremental build and restart the app, click
Rerun  .
.
If you need to deploy a clean build, select Run
> Clean and Rerun from the menu bar, or hold down the
Shift key while clicking Rerun . This action stops the running app,
performs a full clean build, and deploys the new APK to your target device.
When performing a hot swap, your app keeps running but Android Studio automatically restarts the current activity. To disable this default setting:
If automatic activity restart is disabled, you can manually restart the current activity from the menu bar by selecting Run > Restart Activity.
Android Studio enables Instant Run by default for projects built using Android plugin for Gradle 2.0.0 and higher.
To update an existing project with the latest version of the plugin:
Navigate to Build, Execution, Deployment > Instant Run and click Update Project, as shown in figure 3.
If the option to update the project does not appear, it’s already up-to-date with the latest Android plugin for Gradle.

Figure 3. Updating the Android plugin for Gradle for an existing project.
You also need to change the build variant to a debug version of your app to start using Instant Run.
When you deploy a clean build, Android Studio instruments your app to allow
Instant Run to push code and resource updates. Although updating the running
app happens much more quickly, the first build may take longer to complete.
You can improve the build process by configuring a few
DexOptions settings:
maxProcessCount
gradlew --stop
./gradlew --stop
javaMaxHeapSize
The following example sets maxProcessCount to 4 and
javaMaxHeapSize to "2g" in the module-level
build.gradle file:
android {
  ...
  dexOptions {
    maxProcessCount 4 // this is the default value
    javaMaxHeapSize "2g"
  }
}
You should experiment with these settings by incrementing their values and observing the effect on your build times. You could experience a negative impact to performance if you allocate too many resources to the dexing process.
Android Plugin for Gradle version 2.1.0 and higher features additional build process improvements, including incremental Java compilation and dexing-in-process. Incremental Java compilation is enabled by default and reduces compilation time during development by only recompiling portions of the source that have changed or need to be recompiled.
Dexing-in-process performs dexing within the build process rather than in a
separate, external VM process. This not only makes incremental builds much
faster, but also significantly speeds up full builds. To enable this feature,
you need to set the Gradle daemon's maximum heap size to at least 2048 MB. You
can do this by including the following in your project's
gradle.properties file:
org.gradle.jvmargs = -Xmx2048m
If you have defined a value for
javaMaxHeapSize in your module-level build.gradle
file, you need to set the daemon's max heap size to the value of
javaMaxHeapSize + 1024 MB. For example, if you have set
javaMaxHeapSize to "2g", you need to add the following to your
project's gradle.properties file:
org.gradle.jvmargs = -Xmx3072m
On Windows systems, Windows Defender may cause slowdowns while using Instant Run. If you are using Windows Defender, you should exclude your Android Studio project folder from Windows Defender malware scans.
If your version of the Fabric Gradle plugin is lower than 1.21.6, Crashlytics may cause slower build times. To improve build performance while developing your app, you can either update the plugin to the latest version or disable Crashlytics for your debug build variant.
You can help the Android Studio team fix issues you encounter while using Instant Run by submitting feedback about your experience. To report an issue, you need to follow these basic steps:
Enabling the IDE to log the following information about your Instant Run session helps the Android Studio team better understand the issue you encountered and is only ever used for that purpose:
--info command line option and click View > Tool Windows
> Gradle Console (or click Gradle Console in the tool window bar).
InstantRun tag) from the target device or emulator
while the app is running. To learn more about logcat outputs, read Write and View Logs with Logcat.
TARGET-MOTOROLA-NEXUS6).
To grant Android Studio permission to capture and send this information, follow these steps:
After you enable extra logging, recreate any Instant Run issue you previously experienced. Immediately after you reproduce an issue, submit a report as follows:
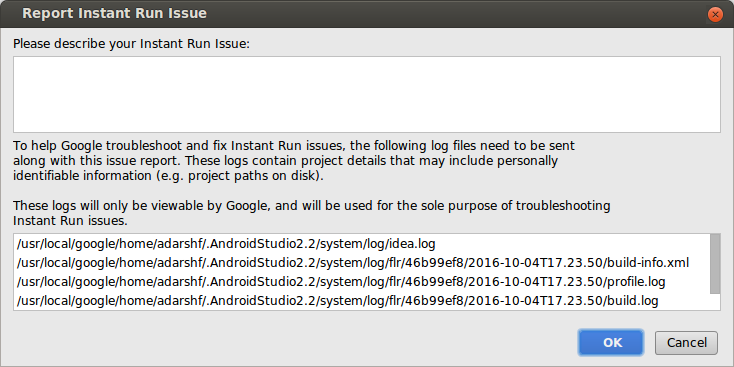
Figure 4. You can provide extra details in the text field and review the logs Android Studio will send along with your report.
Instant Run is designed to speed up the build and deploy process in most situations. However, there are some aspects to using Instant Run that might affect its behavior and compatibility with your app. If you experience any other issues while using Instant Run, please file a bug.
Instant Run uses different techniques to perform hot, warm, and cold swaps that are specific to the API level of the target device. For this reason, while deploying an app to multiple devices at once, Android Studio temporarily turns off Instant Run.
If your project is configured for Legacy Multidex—that
is, when build.gradle is configured with multiDexEnabled
true and minSdkVersion 20 or lower—and you deploy to
target devices running Android 4.4 (API level 20) or lower, Android Studio
disables Instant Run.
If minSdkVersion is set to 21 or higher, Instant Run
automatically configures your app for multidex. Because Instant Run only
works with the debug version of your app, you may need to configure your app for
multidex when deploying your release build variant.
Instrumented tests load both the debug APK and a test APK into the same process on a test device, allowing control methods to override the normal lifecycle of the app and perform tests. While running or debugging instrumented tests, Android Studio does not inject the additional methods required for Instant Run and turns the feature off.
While profiling an app, you should disable Instant Run. There is a small performance impact when using Instant Run and a slightly larger impact when overriding methods with a hot swap. This performance impact could interfere with information provided by performance profiling tools. Additionally, the stub methods generated with each hot swap can complicate stack traces.
Android Studio temporarily disables the Java Code Coverage Library (JaCoCo) and ProGuard while using Instant Run. Because Instant Run only works with debug builds, this does not affect your release build.
Certain third-party plugins that perform bytecode enhancement may cause issues with how Instant Run instruments your app. If you experience these issues, but want to continue using Instant Run, you should disable those plugins for your debug build variant. You can also help improve compatibility with third-party plugins by filing a bug.
Instant Run only instruments your app's main process in order to perform hot swaps and warm swaps. When pushing code changes to other app processes, such as changes to a method implementation or an existing resource, Instant Run performs a cold swap.
If you run your app with Instant Run and open your app using a Work profile (or other secondary profile), your app will crash because the instrumented DEX files used by Instant Run are accessible only from the primary profile's user space.
If you want to continue using Instant Run, just avoid opening your app with
the Work profile and be sure your run
configuration does not use the --user user_id flag.
If you need to use your app with the Work profile, we recommend you create a
new run configuration that
includes the --user user_id flag, specifying the Work
profile user ID. You can find the user ID by executing adb shell pm list
users from command line. When you use the --user flag,
Android Studio disables Instant Run for only that deployment; Instant Run will
work again when you switch to a configuration without the
--user flag.
To disable Instant Run: